How to Clean Your Laptop Screen Easily
Keep Your Laptop Screen Sparkling Clean
Introduction to Laptop Screen Cleaning
Keeping your laptop screen clean is not just about aesthetics; it's also crucial for maintaining optimal performance and extending the lifespan of your device. A dirty screen can cause eye strain, reduce visibility, and even lead to potential damage if you use harsh cleaning methods. This guide will walk you through the process of safely and effectively cleaning your laptop screen, ensuring it stays pristine for years to come.
Importance of Keeping Your Laptop Screen Clean
A clean laptop screen enhances readability and reduces eye fatigue. Dust, fingerprints, and other contaminants can obstruct the view, making it harder to focus on tasks. Additionally, regular cleaning helps prevent scratches and other physical damage that might occur when trying to wipe away stubborn marks.
Common Contaminants on Laptop Screens
Laptop screens are exposed to various contaminants throughout their use. Fingerprints leave behind oils that can attract dust particles, while crumbs and liquids can seep into crevices near the keyboard. Understanding these common issues allows you to address them appropriately during the cleaning process.
Safety Precautions Before Cleaning
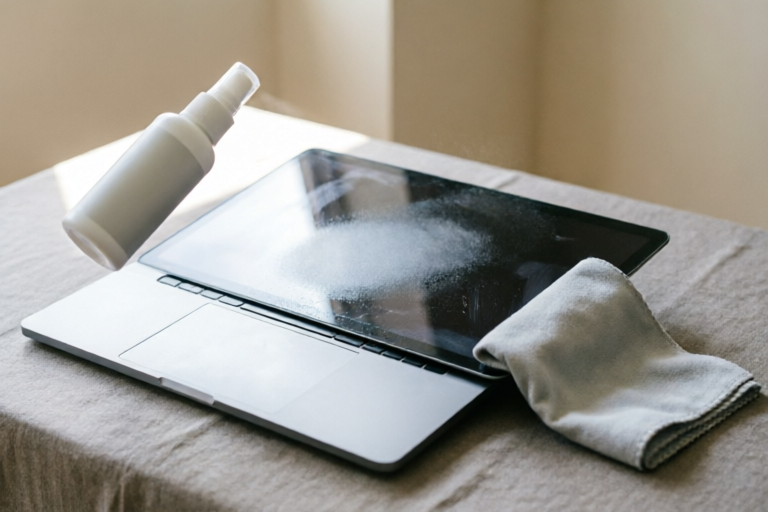
Before diving into the cleaning process, ensure your laptop is powered off and unplugged. Avoid using any liquid directly on the screen, as this can seep inside and cause internal damage. Always use soft, non-abrasive materials like microfiber cloths to avoid scratching the delicate surface.
Essential Tools and Materials Needed
To effectively clean your laptop screen, gather the following items:
- Microfiber cloth: Use a high-quality microfiber cloth designed specifically for electronics.
- Distilled water or screen cleaner: These products are gentle yet effective at removing dirt and grime without damaging the screen.
- Cotton swabs (optional): Useful for reaching tight spaces around keys and ports.
- Compressed air can (optional): Great for dislodging dust from hard-to-reach areas.
Basic Steps for Safe Cleaning
Turning Off and Unplugging the Laptop
Start by powering down your laptop and disconnecting all cables. This ensures that no accidental spills or static electricity can harm sensitive components.
Gently Wiping the Screen with a Dry Microfiber Cloth
Use a dry microfiber cloth to gently wipe the entire surface of the screen. This step removes loose dust and debris without adding moisture.
Using a Damp Cloth for Stubborn Smudges
If there are stubborn smudges or residues, slightly dampen a corner of the microfiber cloth with distilled water or a specialized screen cleaner. Gently rub the area until the mark disappears. Be cautious not to oversaturate the cloth.
Dealing with Specific Issues
Removing Sticky Residue from Fingerprints
Fingerprints often leave behind sticky residues that require more effort to remove. Apply a small amount of rubbing alcohol to a cotton swab and gently dab the affected area. Ensure the alcohol has evaporated completely before turning on your laptop again.
Cleaning Around Keyboard Keys and Ports
Use compressed air to blow out dust from between keys and around ports. For stubborn dirt, dip a cotton swab in rubbing alcohol and carefully clean each key. Avoid applying too much pressure to prevent damage.
Addressing Dust Accumulation in Corners
Dust tends to accumulate in corners where it’s harder to reach. Use compressed air to blast away accumulated particles. If necessary, lightly dampen a cotton swab and gently wipe the corners.
Advanced Cleaning Techniques (Optional)
Utilizing Compressed Air for Deep Cleaning
For thorough cleaning, especially in crevices and vents, use a can of compressed air. Hold the nozzle about an inch away from the surface and spray in short bursts. This method is particularly useful for removing dust bunnies and other debris.
Applying Alcohol-Based Cleaners Cautiously
While alcohol-based cleaners are effective, they should be used sparingly due to their potential to degrade certain types of plastics over time. Test a small, inconspicuous area first to ensure compatibility.
Avoiding Abrasive Materials That Could Scratch the Screen
Avoid using paper towels, tissues, or any rough material that might scratch the screen. Stick to soft cloths like microfiber and apply minimal pressure when wiping.
Maintenance Tips for Longevity
Regular Cleaning Schedule Recommendations
Establish a routine cleaning schedule based on your usage habits. Daily wipes with a dry cloth are recommended for frequent users, while weekly or bi-weekly deep cleans may suffice for less intensive use.
Preventive Measures Against Future Dirt Buildup
To minimize future dirt buildup, consider using protective screen guards or covers. Keep your workspace clean and free of food and drinks to prevent spills. Regularly wiping down the keyboard and ports also helps maintain overall cleanliness.
Summary of Key Points for Effective Laptop Screen Care
By following these steps and incorporating preventive measures into your routine, you can ensure your laptop screen remains clean, clear, and functional for years to come. Remember to always handle your device with care and use appropriate cleaning solutions to avoid any damage.
Comments

Avoided abrasive materials and used a soft cloth. My screen is still intact and shiny as ever.

After following these steps, my son’s laptop screen is finally clean. No more distractions from smudges!
Cleaning around the keys was tricky. Any tips for getting into those tight spaces?

Worked for me. Now I clean my screen weekly. Prevents buildup and keeps it looking sharp.

Is it okay to use rubbing alcohol? The tutorial mentions alcohol-based cleaners cautiously...

I tried the compressed air for dust, but it left tiny scratches. Maybe I was too rough?
I had some sticky residue from fingerprints. Used a cotton swab with a bit of distilled water, worked like magic!

Turned off my laptop, used a damp cloth, and voila! Screen looks brand new. Super helpful!