How to Deep Clean Your Oven Naturally Without Harsh Chemicals
Clean Kitchens, Healthier Families
Introduction: The Case for Chemical-Free Oven Cleaning
In the pursuit of a pristine home, few tasks induce more dread than cleaning the oven. For years, consumers have relied on powerful commercial sprays and heavy-duty powders promising to dissolve burnt-on food in minutes. While effective, these products come with a hidden cost to both our health and the environment. Many traditional oven cleaners contain caustic alkalis, such as sodium hydroxide (lye) or ammonium hydroxide, which emit strong fumes capable of irritating the eyes, throat, and lungs. For individuals with asthma, sensitive skin, or allergies, these harsh chemicals pose a genuine health hazard.
The potential dangers extend beyond immediate exposure. Residues left on oven surfaces after rinsing can leach onto food when heat rises, introducing toxic compounds directly into your meals. Furthermore, the manufacturing and disposal of these synthetic cleaners contribute to industrial pollution and plastic waste in landfills. This is where the paradigm shifts toward green living comes into play. By switching to natural alternatives, we embrace a safer, eco-friendly choice that protects our family’s well-being without compromising on performance.
Natural cleaning relies on simple household ingredients found in almost every pantry. Baking soda and distilled white vinegar, for instance, offer incredible degreasing and descaling properties. Unlike their synthetic counterparts, these substances are non-toxic, biodegradable, and incredibly cost-effective. Choosing to clean your oven naturally isn't just about hygiene; it is a commitment to sustainable living and preventative health care. In this comprehensive guide, we will walk you through the entire process, ensuring your oven shines like new without ever inhaling a single noxious fume.
Preparing Your Natural Cleaning Kit
Before diving into the gritty work of removing baked-on grime, preparation is paramount. Just as a surgeon prepares their tools before an operation, you need the right equipment to execute a thorough natural clean. One of the misconceptions about DIY cleaning is that it lacks efficiency; however, with the right kit, natural methods rival professional grade results. This section outlines the essential ingredients and tools required to tackle the toughest jobs.
Essential Ingredients
The cornerstone of this project consists of three primary ingredients: baking soda, distilled white vinegar, and warm water. Baking soda (sodium bicarbonate) acts as a mild abrasive that scrubs away surface debris without scratching glass or enamel. It also works chemically to neutralize odors. Distilled white vinegar provides acetic acid, which breaks down grease and dissolves mineral deposits. The reaction between the two creates carbon dioxide bubbles that help lift dirt. Finally, warm water is used to thin out the mixtures to manageable consistencies.
You may also want to consider adding a small amount of natural dish soap to your arsenal. Dish soap cuts through grease exceptionally well and can be added to the initial wash for an extra layer of cleaning power. Always opt for eco-friendly dish soap free from dyes and parabens to maintain the integrity of your chemical-free approach.
Necessary Tools and Equipment
Gather your tools before opening the package of baking soda to streamline the process. You will need several microfiber cloths; these are superior to paper towels because they trap dust and grease rather than pushing it around. Additionally, procure a bowl large enough to mix your paste—ceramic or stainless steel is preferable to plastic, which can absorb oils. A spray bottle is essential for applying the vinegar solution evenly across the oven interior. Do not reuse the spray bottle if it previously contained bleach or other harsh chemicals to avoid cross-contamination.
For the mechanical removal of stubborn chunks, a plastic scraper or a dull spatula is invaluable. Metal scrapers can scratch delicate oven coatings, so stick to plastic or wood handles. A pair of rubber gloves is non-negotiable. Even with natural ingredients, baking soda can dry out hands, and prolonged contact with hot surfaces is dangerous. Lastly, keep a trash bag nearby to dispose of removed oven racks and foil liners immediately, keeping your workspace tidy.
Creating and Applying the Baking Soda Paste
Once your kit is assembled, it is time to create the active cleaning agent. The success of this method hinges on the texture and application technique of the baking soda paste. This step requires patience and attention to detail to ensure every corner receives adequate treatment.
Optimal Mixture Ratios
To create the perfect paste, the general rule of thumb is to mix three parts baking soda to one part water. Start by placing half a cup of baking soda into your mixing bowl. Slowly add warm water, a tablespoon at a time, stirring continuously until the mixture resembles thick oatmeal or wet sand. It should hold its shape when scooped but not be too runny to slide off the sides of the oven. If it is too stiff, it won't spread easily; if it is too liquid, it will drip onto the floor. Small adjustments are key. Some users find that adding a touch of lemon juice instead of water works wonders due to the added acidity, but plain water maintains the most neutral pH profile.
Application Technique
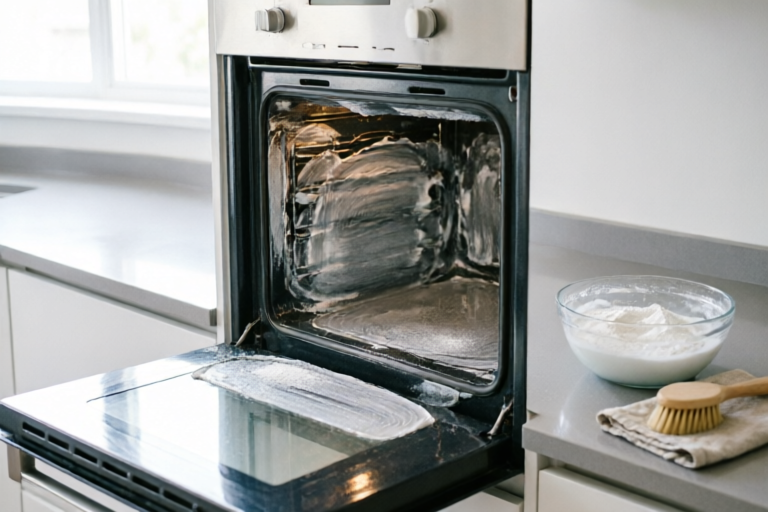
Start by removing the oven racks, trivets, and any broiler pans. These components should be cleaned separately in a bathtub or large sink using hot water and dish soap. Now, wearing your rubber gloves, dip your microfiber cloth or sponge into the paste. Apply a generous layer to the interior walls of the oven, deliberately avoiding the electrical heating elements if you have an electric stove. Heating elements can crack if covered in moist substances and may corrode over time.
Cover the entire interior surface where grime is visible. Focus particularly on the back panel and the ceiling of the oven where drips accumulate most. The bottom pan does not necessarily need thick coating, but if there are splatters, cover them too. Once coated, seal the oven door shut. The paste works by sitting and penetrating the layers of carbonized fat. Most experts recommend leaving this paste to work overnight, typically for at least 12 hours. During this dwell time, the baking soda slowly absorbs moisture and loosens the bonds holding the grease to the metal, making the subsequent scrubbing significantly easier.
Activating the Solution and Scrubbing Stains
The following morning is the moment of truth. Overnight, the paste will likely have dried out, turning into a solid white crust over the black stains. This is normal and actually beneficial, as it holds the abrasive powder against the grease longer. Now, we introduce the second phase: activation.
The Fizzing Reaction
Fill your spray bottle with undiluted white vinegar. Spray the dried baking soda paste generously with the vinegar. You will witness an immediate and satisfying fizzing reaction. This occurs because the acid (vinegar) reacts with the base (baking soda), releasing carbon dioxide gas. While some debate exists regarding whether this bubbling action actually enhances cleaning power chemically, mechanically, it helps loosen debris trapped beneath the dried layer. The expansion of gas pockets physically disrupts the bond between the grease and the oven surface. Spritz evenly until the surface is damp but not soaked, as excessive liquid could dilute the remaining abrasive power of the soda.
Scrubbing Techniques for Stubborn Grease
After letting the fizz settle for a few minutes, grab a fresh scouring pad or a stiff-bristled brush. Begin scrubbing in circular motions. For heavily burnt areas that did not lift easily during the night, apply a little more pressure. The baking soda now acts as a fine grit sandpaper, lifting the caked-on food residue. Be mindful of the temperature; never scrub a cold oven if it was recently used. Also, pay close attention to the glass door. The inside of the oven door often accumulates a film of grease that penetrates between the panes. If the paste has penetrated the seal, you may need to remove the inner door glass panel according to your manufacturer’s manual to clean deep within.
If you encounter persistent burnt-on spots, do not despair. Create a paste with less water to form a thicker consistency and reapply it directly to the spot. Let it sit for another 30 minutes. Alternatively, you can place a small bowl of boiling water inside the closed oven for 20 minutes to steam the area. The heat softens the fats, allowing the scrub to glide through effortlessly. Repeat the spray and scrub cycle as necessary. Patience is your greatest ally here; forcing the mess too early can lead to damaged surfaces.
Final Rinse, Dry, and Future Maintenance
The cleaning phase concludes only after all residue is removed. Leftover baking soda particles can create a chalky film that affects the taste of food and causes smoke during the next preheat cycle.
Rinsing and Drying
Dampen a clean microfiber cloth with warm water and rinse the surfaces repeatedly. Change the water frequently as it becomes cloudy. For a deeper rinse, you can spray a small amount of diluted vinegar-water solution (50/50 mix) to wipe down the interior. This removes the last traces of alkalinity. Follow this with a final dry wipe using a clean, dry towel. Moisture trapped in a dirty oven can cause rust over time, so drying is crucial. Once the walls and floor are bone-dry, reinstall your oven racks. Give the racks themselves a final wipe with a disinfectant-safe cloth to ensure they are free of soap residue.
Prevention and Future Tips
Maintaining a chemical-free oven requires a proactive mindset. Preventive measures save you the heavy labor of deep cleaning later. Consider placing a piece of aluminum foil under your dishes during cooking to catch spills instantly. Never use this foil on the bottom of the oven itself unless specified by the manufacturer, as it can reflect heat improperly and damage the appliance. Wipe up spills as soon as the oven cools down. Even a quick wipe takes seconds compared to an hour-long scrub.
Implementing a "light clean" schedule monthly helps prevent buildup. Simply spray a little vinegar on the walls and wipe them down once a week. Additionally, investing in silicone baking mats or ceramic roasting trays can contain liquids effectively. Remember, the smell of a clean oven is pleasant and neutral, unlike the pungent scent of burning plastics or old food. By sticking to these natural habits, you preserve the lifespan of your appliance and maintain a healthier kitchen environment for your family. With these steps, your oven will look brand new, proving that the green path is indeed the most effective path to cleanliness.
Comments

Works for me, thanks!

Super quick read. Trying this weekend since I burned cheese yesterday lol.

Added a sprinkle of salt to the paste to scrub harder edges. Game changer honestly.
Great alternative! Just wish there was more info on removing the sticky residue at the end.

How long should I leave the baking soda paste? Left mine overnight but worried about drying out too much.

This actually worked! My oven looks brand new and no headache from fumes. 👏