## Introduction to Chemical-Free Cleaning
Keeping a clean oven is essential for culinary enthusiasts who prioritize food safety and family health. However, many conventional oven cleaners available on supermarket shelves contain caustic chemicals such as sodium hydroxide and lye. While effective at removing baked-on grime, these substances come with significant drawbacks. They emit strong fumes that can irritate the respiratory system, pose risks of skin burns upon contact, and leave residues that may transfer to future meals.
For homeowners concerned with creating a toxin-free living space, transitioning to natural cleaning agents is not just an option—it is a necessity. Natural alternatives like baking soda and white vinegar offer powerful degreasing capabilities without the associated health hazards. They break down carbonized grease effectively, leaving the oven gleaming while ensuring that the air you breathe remains uncontaminated by volatile organic compounds (VOCs).
Furthermore, adopting a chemical-free cleaning routine is economically beneficial. Commercial sprays often require repeat purchases, whereas baking soda and vinegar are inexpensive staples found in almost every pantry. By making the switch, you contribute to reducing plastic waste from industrial bottles and lower the chemical load entering the water system during the washing process. This guide details how to transform your oven cleaning routine into a safer, more sustainable practice.
## Essential Tools and Ingredients
Before embarking on your cleaning journey, gathering the right materials is crucial for success. Using inappropriate tools can lead to scratches on enamel surfaces or insufficient cleaning power. Here is a comprehensive list of household items required for this project:
### Baking Soda (Sodium Bicarbonate)
Baking soda is the cornerstone of natural oven cleaning. It acts as a mild abrasive and helps lift stubborn residue through its alkaline properties. Ensure you have a large container of plain baking soda. Avoid flavored varieties or those mixed with cornstarch or other additives, as these can leave sticky residues after drying.
### White Distilled Vinegar
White vinegar is the perfect companion to baking soda. Its acidity reacts with the alkaline paste to create a fizzing action that helps loosen grease. It also serves as a natural disinfectant and deodorizer, removing the lingering smell of burnt food. Make sure to choose unfiltered, pure white vinegar rather than apple cider vinegar, as the latter may stain light-colored interiors due to its amber hue.
### Spray Bottles
A sturdy spray bottle filled with warm water or vinegar solution is vital for application. When the baking soda paste dries out too quickly, spraying a little liquid helps reactivate it. A fine mist nozzle ensures even distribution across walls and ceilings without dripping excessively onto the heating elements.
### Soft Sponges and Non-Abrasive Scouring Pads
While steel wool might seem efficient, it can permanently scratch porcelain enamel. Opt for soft cellulose sponges or nylon scrubbing brushes. For glass doors, use microfiber cloths which trap dust and grease efficiently without leaving lint.
### Plastic Scrapers or Spatulas
Hardened carbon buildup cannot always be removed by wiping alone. A plastic putty knife or old credit card works wonders to gently lift thick layers of grime without damaging the metal coating.
### Rubber Gloves
Even natural ingredients can dry out hands with prolonged exposure. Wearing rubber gloves protects your skin and keeps oils from transferring back onto the cleaned surfaces.
## Step-by-Step Baking Soda Paste Method
The baking soda paste method is the gold standard for deep cleaning ovens. It requires patience but yields excellent results on moderate to heavy grime. Follow these detailed instructions for optimal performance.
### Step 1: Preparation and Removal
Start by unplugging the oven if it is electric, or turning off the gas supply. Remove all internal components including oven racks, broiler pans, and pizza stones. These parts can be soaked separately in a sink full of hot water and dish soap. Wipe away loose crumbs or debris from the bottom of the oven using a dry cloth or paper towels. This pre-cleaning step prevents dirt from mixing with your cleaning paste and creating a muddy mess.
### Step 2: Mixing the Paste
In a small bowl, mix approximately three-quarters of a cup of baking soda with a few tablespoons of water. Stir until you achieve a thick, spreadable consistency similar to toothpaste. The mixture should hold its shape when scooped up. If it is too runny, add more baking soda; if it is too crumbly, add water drop by drop. Consistency matters because a too-wet paste will drip onto the floor, while a too-dry paste won’t penetrate the grease.
### Step 3: Application
Using a sponge or your gloved hand, apply the paste generously to the interior walls, ceiling, and floor of the oven. Be careful to avoid the heating elements, coils, or thermostats, as moisture can cause electrical shorts or corrosion. Do not apply the paste to the outer rim or gaskets unless necessary, as it can be difficult to remove completely.
Spread the paste evenly over stained areas. You do not need to worry if it looks uneven; the goal is to cover the surface so the chemical reaction can occur. Once applied, place a damp cloth over the interior or simply close the door to keep moisture from evaporating too rapidly. This accelerates the breakdown process.
### Step 4: Waiting Period
Leave the paste to sit overnight. Ideally, this should be at least 12 hours. The longer it sits, the softer the carbonized grease becomes. During this time, the alkaline nature of the soda penetrates the bonds holding the grease to the metal. If you are in a rush, two to three hours will work, but the full night allows for maximum efficiency.
### Step 5: Scrubbing and Removal
After the waiting period, open the oven to find the paste has dried and turned slightly brown. Take a wet sponge and gently scrub the surfaces. The grime should slide off easily. If you encounter stubborn spots, reapply a bit more paste directly to the area and let it sit for another hour. Use a plastic scraper to lift thicker chunks without scratching.
Once most of the buildup is gone, wipe the interior down with a damp cloth. Change the water frequently to ensure you are not redepositing grease onto the walls.
## Alternative Techniques for Stubborn Residue
Sometimes, despite best efforts, certain residues remain adhered to the oven surface. Fortunately, there are supplementary techniques involving the interaction between ingredients and heat to tackle these challenges.
### The Vinegar Reaction Trick
If you have already applied the baking soda paste and let it dry, you can enhance the cleaning power by spraying undiluted white vinegar directly onto the paste. This triggers an immediate acid-base reaction known as effervescence. The fizzing helps lift particles from the pores of the enamel. Spraying vinegar also washes away residual baking soda, preventing a whitish powdery film from remaining on the surfaces. Use a microfiber cloth dipped in vinegar to buff the interior afterward for a shine.
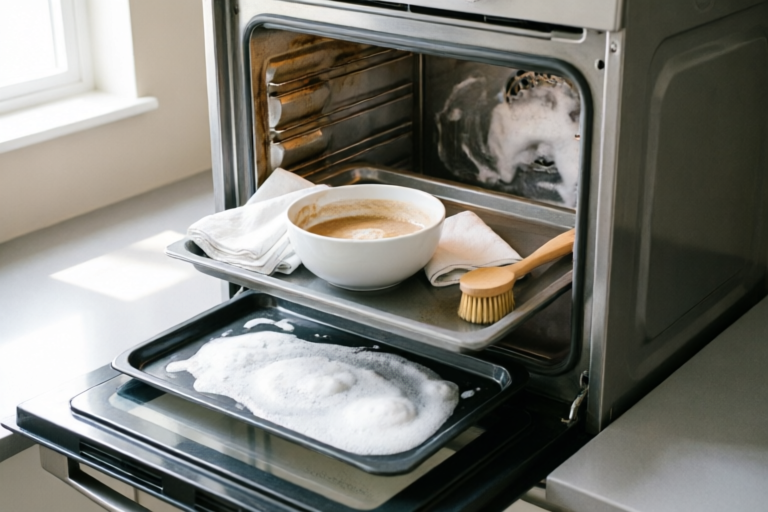
### Water Steam Cycle Method
For hard-to-reach corners or the upper heating element, utilize the steam function. Place an oven-safe bowl filled with water on the middle rack. Set the oven to 400 degrees Fahrenheit (200 degrees Celsius) for 30 minutes. The boiling water generates intense steam which loosens hardened grease and fats throughout the chamber. Be cautious as the temperature will be high. After steaming, allow the oven to cool until it is safe to touch, then wipe the interior. The softened grime should wipe away with minimal effort. This method is particularly useful before applying the baking soda paste to reduce initial thickness.
### Lemon Juice Solution
Citrus acids provide another avenue for cleaning. Cut a lemon in half and rub it directly over oily stains, or boil sliced lemons in a pot of water on the stovetop and place the pot inside the oven for 30 minutes. The citrus scent leaves a fresh aroma and the acid cuts through grease effectively. This is especially good for removing odors caused by burned food.
## Prevention and Long-Term Maintenance
Cleaning an oven is labor-intensive. The most efficient way to maintain cleanliness is to prevent heavy accumulation in the first place. Implementing preventative measures ensures your oven stays spotless with minimal weekly effort.
### Immediate Spill Management
Never ignore small drips or splatters during cooking. As soon as the oven cools, wipe up any overflow immediately. Liquid sugar caramelizes quickly when exposed to heat and turns into a black, hard layer that is incredibly difficult to remove later. Having a rag or disposable wipe handy near the oven encourages this quick-response habit.
### Use Protective Liners
Oven liners made from silicone or foil-lined mats placed at the bottom of the oven can catch drips before they burn onto the floor. Ensure the liner is rated for high temperatures and does not cover ventilation vents. Alternatively, you can line the bottom with aluminum foil, though this should be done carefully to avoid blocking airflow or reflecting heat improperly. Check your manufacturer’s manual, as some manufacturers advise against using liners under specific heating elements.
### Routine Wiping
Perform a light cleaning once a week using a vinegar spray. Simply spray a mixture of water and vinegar, let it sit for five minutes, and wipe down the walls. This removes light films before they solidify. This "maintenance clean" takes only ten minutes and prevents the need for deep scrubs monthly.
### Rack Care
Clean the racks regularly along with the interior. Soak them in the bathtub or sink with baking soda and warm water overnight. Wire brushes can remove stuck-on bits from the bars. Keep racks shiny and rust-free to extend their lifespan and ensure they cook evenly.
## Frequently Asked Questions About Natural Oven Cleaning
**Q: Will baking soda damage the oven finish?**
A: No. Baking soda is chemically inert and safe for most oven surfaces, including porcelain and stainless steel. However, always test on a small inconspicuous area first if you have a coated specialty finish. Avoid letting the paste sit for several days, as prolonged exposure could theoretically dull matte finishes.
**Q: Can I clean the oven glass door with this method?**
A: Absolutely. Apply the paste to the outside of the door as well. For the inner pane of double-glazed doors, if there is a gap, you can separate the panes slightly to clean inside, or use a thin brush to apply paste between layers. Always ensure no liquid gets between sealed panels as this can cause fogging.
**Q: Is this method effective on gas ovens?**
A: Yes, though extra care is needed around the burners. Do not spray solutions directly onto the igniters or burner ports. Focus on the walls and floor. Use a dry brush or vacuum attachment to remove paste residue around ignition sources.
**Q: Does vinegar smell go away?**
A: Yes. While vinegar has a strong pungent odor initially, it dissipates quickly once heated or wiped dry. By the next morning, the smell will be barely noticeable, replaced instead by the fresh scent of baking soda or lemon.
**Q: What if I still see streaks after cleaning?**
A: Streaks often come from leftover soap residue or mineral deposits in water. Rinse the cloth thoroughly with distilled water for the final polish. Buff dry with a clean, dry microfiber towel to eliminate streaking.
## Conclusion: Benefits of a Clean, Safe Oven
Transforming your oven cleaning routine from a hazardous chore into a safe, natural process offers profound benefits. By utilizing common household staples like baking soda and vinegar, you eliminate the risk of inhaling corrosive fumes and the danger of chemical burns. This approach aligns with a holistic lifestyle focused on wellness and sustainability.
Beyond personal health, a well-maintained oven operates more efficiently. Built-up carbon insulates heating elements, causing the oven to work harder and consume more energy. Keeping the interior clean ensures consistent heat distribution and precise temperature control for your cooking. Moreover, the aesthetic appeal of a sparkling oven contributes to a cleaner, more inviting kitchen atmosphere.
We encourage you to adopt the practices outlined in this guide. Whether it is the deep scrub of the baking soda method or the simple habit of weekly wiping, consistency is key. Over time, these natural techniques become second nature, preserving your appliances and protecting your family’s health. Remember, the most effective cleaning agent isn’t always found in a store aisle; often, it’s hiding in plain sight within your own pantry. Embrace the power of natural cleaning for a healthier, happier home.