# How to Clean a Blender Thoroughly Without Damaging Any Parts
## Introduction
In today's fast-paced culinary world, the blender has become an indispensable tool in nearly every modern kitchen. From morning protein shakes and fruit smoothies to evening pesto sauces and nut milks, we rely on these powerful machines to transform solid ingredients into liquid perfection. However, with great power comes a responsibility to maintain. The hidden danger lurking within the intricate mechanics of a blender is bacterial growth, residual odor, and wear and tear caused by improper cleaning.
A dirty blender doesn't just pose a health risk; it can significantly shorten the lifespan of your appliance. Food particles can get lodged in areas you can't see, such as beneath the blade assembly or around the rubber gaskets, leading to unpleasant smells and even mechanical jams. Furthermore, aggressive cleaning habits—like using steel wool or putting the electric base in the sink—can ruin the unit entirely. Many users are left frustrated when their expensive high-speed blender stops performing as effectively because the internal components have been compromised by neglect or rough handling.
This comprehensive guide is designed to walk you through the most effective, safe, and thorough methods for cleaning a blender. We will move beyond the surface-level rinse and delve into the specifics of component care, safety protocols, and long-term maintenance strategies. Whether you own a personal bullet blender, a professional-grade Vitamix, or a classic food processor hybrid, understanding the nuances of blender hygiene is crucial. By following these structured steps, you ensure that every blend is safe for consumption and that your machine remains a reliable partner in your kitchen for years to come.
## 1. Essential Safety Precautions and Preparation
Before you even touch a sponge or turn a knob, the most critical phase of cleaning is preparation. Safety is paramount when dealing with appliances that combine electricity, high-speed rotation, and razor-sharp components. Ignoring safety protocols can lead to severe injuries or damage to both the user and the machine.
### Electrical Safety First
The number one rule of blender maintenance is to never immerse the motor base in water. Even a small amount of water can short-circuit the internal electronics, rendering the appliance useless. Always unplug the blender immediately after you are done using it. Do not simply turn the switch off; disconnect the power cord from the wall outlet to eliminate any risk of accidental activation. This seems basic, but in a busy kitchen environment, it is easy to reach for a plug while holding a wet pitcher.
Additionally, ensure your hands are completely dry before handling the electrical components or the motor base. Moisture on your skin combined with the metal contacts of the cord or outlet creates a pathway for electrical current, which can result in shock. If your hands are wet from washing vegetables or dishes, take a moment to dry them thoroughly.
### Securing the Pitcher and Detaching from the Base
Once unplugged, proceed to detach the pitcher from the motor base. Most blenders feature a locking mechanism that twists or clicks into place. Handle the pitcher carefully by the handle or the reinforced body, avoiding the area near the bottom where the blades are housed. When separating the pitcher from the base, listen for the click of the lock disengaging. Pull gently upwards; do not force it if it feels stuck, as this could crack the base or damage the coupling shaft.
### Understanding the Blade Hazard
Even after unplugging the blender, the blade assembly remains dangerously sharp. It is designed to pulverize ice, fibrous plants, and hard seeds. A common myth is that the blades stop spinning instantly and pose no threat once the machine is off. This is false; the metal edges remain intact and capable of slicing skin easily. Never put your hand or fingers inside the pitcher to wipe out food residue while the blades are still assembled. Always treat the interior of the blender as a hazard zone until you have verified that it is empty and prepared for washing. Wear cut-resistant gloves if you feel confident moving parts manually, but generally, the strategy should be to remove the pitcher before attempting any close contact cleaning.
## 2. Utilizing the Self-Cleaning Function
Modern high-performance blenders are engineered with efficiency in mind, often featuring a dedicated "self-clean" cycle. This function is the cornerstone of daily maintenance and saves you from the immediate labor of scrubbing. It uses hydraulic force to blast away loose debris, making the manual effort minimal afterwards.
### The Right Mixture for Effective Cleaning
To activate this feature, fill the jar halfway with warm water. Warm water is superior to cold water because it helps dissolve grease and oils from fruits like avocados or yogurt-based smoothies. Boiling water should be avoided, especially for plastic pitchers, as extreme heat can warp the material over time or cause clouding. Add a single drop of mild dish soap. Too much soap can create excessive foam that clogs the drainage or gets stuck in the gears, while too little may not emulsify the food particles effectively.
### Executing the Cycle Safely
Secure the lid tightly onto the pitcher before running the cycle. If the lid does not seal properly, the high-pressure water jet created during blending will spray hot, soapy water all over your counter, creating a mess and potentially slipping hazards. Set the blender to the lowest speed setting initially, then gradually increase it, or simply run the pulse function followed by a brief low-speed burst, depending on your model’s instructions. Run the cycle for only about 30 to 60 seconds. This is sufficient to dislodge loose food particles without stressing the motor.
### Rinsing After Self-Cleaning
After the self-clean cycle finishes, pour out the soapy water immediately. Residual soap inside the jar can interfere with the taste of your next batch. Fill the jar with fresh cold water again and pulse it briefly to rinse the interior surfaces. Pour this out and repeat once more if necessary. Allow the pitcher to sit open for a few minutes to let gravity drain the remaining liquid. This self-cleaning process removes 90% of the visible residue, leaving only the stubborn spots under the blades for manual attention.
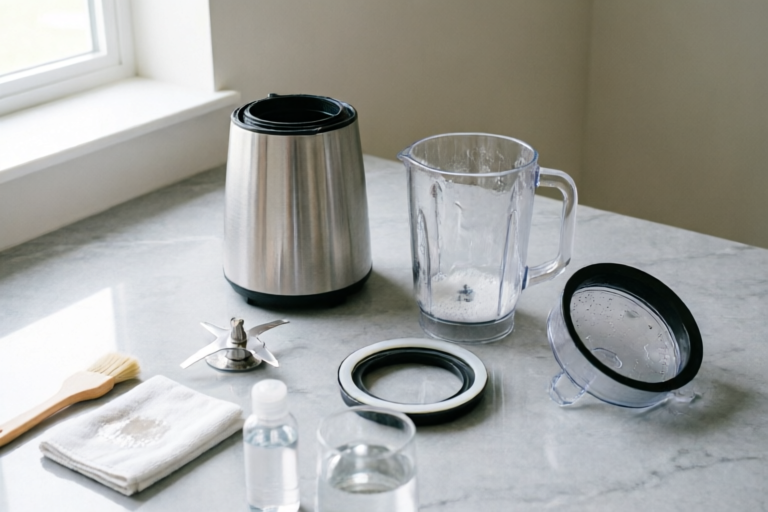
## 3. Hand-Washing Detachable Components
While the self-clean cycle handles the bulk of the work, true thoroughness requires manual intervention for detachable parts. Overlooking these components is where mold spores and lingering odors typically take root.
### Identifying Removable Parts
Identify all parts that can be removed from the main housing. These usually include the lid, the sealing gasket, the container (pitcher or jar), and the blade assembly cap. If your blender has separate pieces for the blade, these must be taken apart completely to access the hidden food pockets. Check your manufacturer’s manual to confirm which parts are dishwasher safe versus those recommended for hand-washing only. Glass containers are typically more durable, but plastic jars can scratch easier, requiring gentler treatment.
### Choosing the Right Tools
Select non-abrasive cleaning tools specifically for this task. Steel wool scouring pads are a major enemy of blenders. While they remove tough stains, they leave micro-scratches on plastic and aluminum surfaces. These scratches eventually trap bacteria, dirt, and food particles, creating a permanent harbor for germs that soap cannot wash away. Instead, use soft nylon sponges, non-scratch scrubbers, or specialized bottle brushes with long handles designed to reach the bottom of narrow jugs.
### Soaking Technique for Deep Cleaning
For components that have dried-on food, soaking is the best pre-treatment. Fill a basin or sink with warm soapy water. Submerge the lid, the jar, and the removable blade cap. Allow them to soak for 10 to 15 minutes. This softens the sticky residues like honey, protein powder clumps, or berry skins. During soaking, inspect the gaskets closely. Use a toothbrush dipped in soapy water to gently scrub the crevices of the rubber rings and the threads of the jar. Toothbrushes are ideal here because their bristles fit into narrow gaps that larger sponges cannot reach. Be gentle to avoid stretching the rubber, which can compromise the seal later on.
## 4. Safe Handling of the Blade Assembly and Seals
The blade assembly is the heart of the blender but also its greatest liability regarding safety and hygiene. This is the most delicate part of the cleaning process.
### Removing the Rubber Gaskets
Many blenders have a rubber gasket seated underneath the blade assembly to prevent leakage. Over time, this gasket traps black specks of rotting food that no amount of wiping can reach. To clean this, you must carefully pry the gasket out. Use a blunt knife edge or a wooden chopstick to lift the edge of the ring gently. Never use sharp metal tools that could slice into the rubber, causing tears. Once removed, scrub both sides of the gasket thoroughly with warm soapy water and the toothbrush mentioned earlier. Dry it completely before reseating it.
### Protecting Your Fingers
When handling the blade assembly, always hold the blades by the base or the central hub. Imagine the blades are live wires. Place the assembly on a cutting board or a folded towel during cleaning rather than holding it over your hand. If you must wash around the sharp edges, curl your fingers inward towards your palm so they cannot slide into the blade path. Some enthusiasts recommend using tongs or kitchen scissors to manipulate the blades, keeping your skin at a safe distance.
### Inspecting for Damage
While cleaning, perform a visual inspection of the blade assembly. Look for rust spots, which indicate water exposure where it shouldn’t be. Rust can degrade the metal and eventually contaminate your food. Also, check if the blades are dull or bent. If the blades appear damaged, replacement parts should be ordered from the manufacturer. Using a damaged blade set puts more strain on the motor, causing it to overheat and potentially burn out prematurely.
## 5. Proper Drying, Reassembly, and Storage
Cleaning is only half the battle; drying and storing the appliance correctly prevents the regrowth of bacteria and ensures the machine lasts longer.
### Air Drying Completely
Do not rush to put the blender away while it is damp. Moisture is the breeding ground for mold and mildew. Lay all components flat on a clean kitchen towel or a drying rack in a well-ventilated area. Avoid stacking wet parts on top of each other, as trapped moisture between layers will promote bacterial growth. If you live in a humid climate, consider leaving the lid slightly ajar to allow air circulation inside the pitcher. Let everything dry for several hours or overnight before reassembling.
### Correct Reassembly
Ensure all components are bone-dry before reattaching the pitcher to the motor base. Moisture inside the coupling port can corrode the metal pin that connects the two units. Push the pitcher firmly onto the base until you hear the lock engage securely. If the jar sits crookedly, realign it gently rather than forcing it. Check the stability by giving it a slight nudge; it should not rock. Ensure the lid is snapped tight and the safety latch (if applicable) is secured.
### Storage Strategies for Hygiene
Finally, consider how you store the blender when not in use. Store the pitcher upside down if possible. This allows any residual moisture to drain out of the jar completely and prevents airborne dust from settling inside the open top. Covering the motor base with a cloth cover protects it from kitchen dust, which can be abrasive and eventually coat the motors. Keep the blender in a cool, dry place away from direct sunlight, as UV rays can yellow and weaken plastic components over time. Avoid storing the blender with food remnants inside, no matter how small.
## Additional Tips for Stubborn Stains and Odors
Sometimes, water and soap aren't enough. Specific ingredients leave distinct marks and smells that require targeted solutions to restore the blender’s pristine condition.
### Removing Color Stains
Ingredients like turmeric, berries, and beets are notorious for staining clear plastic pitchers. To remove yellow turmeric stains, create a paste using baking soda and lemon juice or vinegar. Apply it to the stained area, let it sit for an hour, then scrub gently. For dark purple blueberry stains, hydrogen peroxide is an excellent bleaching agent. Just be careful not to let it sit too long on sensitive plastics. If the pitcher is white, lemon slices blended with water can help brighten the color naturally through oxidation.
### Eliminating Lingering Odors
If your blender smells like last week’s garlic sauce even after washing, the issue lies in the unseen seals. Mix equal parts of white vinegar and water, add a tablespoon of baking soda for fizz, and run the self-clean cycle with this mixture. Vinegar is a natural disinfectant that neutralizes odors without leaving a chemical scent. Alternatively, leave a mixture of water and baking soda in the pitcher overnight to absorb strong odors. Citrus peels can also be blended with water to leave a fresh scent behind.
### Maintenance Schedule
Develop a routine. Daily: Rinse with water immediately after use and run a quick soap-water cycle. Weekly: Perform the deep hand-wash described above, removing gaskets and scrubbing blades. Monthly: Inspect parts for wear and check for cracks in the pitcher. Consistency prevents the build-up of difficult grime.
## Common Mistakes to Avoid
To protect your investment, be aware of behaviors that accelerate degradation.
1. **Never wash the motor base in water.** Wipe it with a damp cloth only.
2. **Do not blend extremely hot liquids** if your pitcher is designed for cold use only, as pressure buildup can cause the lid to pop off unexpectedly.
3. **Avoid harsh chemicals** like bleach or oven cleaner, as they can degrade rubber seals and discolor plastic.
4. **Don’t force stuck parts.** If something won’t budge, apply oil to loosening screws or consult a technician rather than brute-forcing it.
## Conclusion
Maintaining a blender is an exercise in patience and precision. By adhering to strict safety precautions, utilizing the self-cleaning functions wisely, hand-washing detachable components with the right tools, handling the dangerous blade assemblies with extreme caution, and ensuring proper drying and storage, you guarantee a hygienic and efficient kitchen tool. Neglecting these steps leads to cross-contamination, unpleasant smells, and costly repairs. However, investing five to ten minutes of care into your machine daily pays dividends in health safety and longevity. Remember, a clean blender blends better. Treat your appliance with respect, and it will reward you with thousands of delicious, healthy meals. Stay safe, stay clean, and enjoy your blending experience.
## Frequently Asked Questions
**Q: Can I put my blender pitcher in the dishwasher?**
A: Many modern blenders have dishwasher-safe pitchers, but it depends on the material. Heat from the dishwasher can warp plastic jars. It is generally safer to hand-wash to preserve clarity and integrity.
**Q: Why does my blender smell bad even after cleaning?**
A: This is usually due to trapped food particles in the rubber gasket under the blade assembly. Disassemble and clean this area manually with a toothbrush.
**Q: How often should I deep clean my blender?**
A: You should run the self-clean cycle after every use. For a deep hand wash with part removal, do this at least once a week.
**Q: Is it safe to use metal spoons to scoop out food from the blender?**
A: No, never use metal utensils inside the blender. They will chip the coating of the blade and damage the walls of the jar. Use silicone spatulas instead.
**Q: What should I do if the blender starts leaking during operation?**
A: Turn it off immediately. This indicates a worn seal or cracked jar. Stop using it until you replace the gasket or repair the component to avoid electrical damage.