How to Deep Clean Kitchen Cabinets Properly
Shine Beyond Surfaces: Transform Your Kitchen Storage
How to Deep Clean Kitchen Cabinets Properly
1. Introduction: The Importance of Clean Kitchens
The kitchen is often referred to as the heart of the home, but few stop to appreciate the crucial role that storage plays in its overall hygiene and functionality. While most homeowners dedicate ample time to mopping floors and wiping down countertops, the interior and exterior of kitchen cabinets frequently remain neglected. Over months and years, a thin layer of dust, grime, sticky residue, and even potential bacteria can accumulate unseen.
Deep cleaning your kitchen cabinets is not merely an aesthetic endeavor; it is a fundamental aspect of maintaining a healthy living environment. Grease and food particles left on cabinet interiors can attract pests such as cockroaches and ants, creating a sanitation risk that extends well beyond the storage area itself. Furthermore, accumulated dust can impact air quality, especially in open-plan kitchens where airflow circulates through cabinetry gaps.
Beyond health concerns, there is significant aesthetic appeal in maintaining hygienic kitchen storage spaces. Imagine pulling out a drawer and being greeted by a pristine interior rather than a dusty shelf. A clean kitchen projects a sense of order and care, which can psychologically improve the experience of cooking and dining. In this comprehensive guide, we will walk you through the entire process of deep cleaning kitchen cabinets, ensuring they look brand new and function optimally for years to come.
2. Preparation: Tools Needed and Emptying the Space
The foundation of any successful deep clean lies in thorough preparation. Rushing into the process without the right equipment or a clear plan often leads to incomplete cleaning or damage to delicate finishes. Proper preparation also sets the stage for efficiency, minimizing back-and-forth trips and frustration.
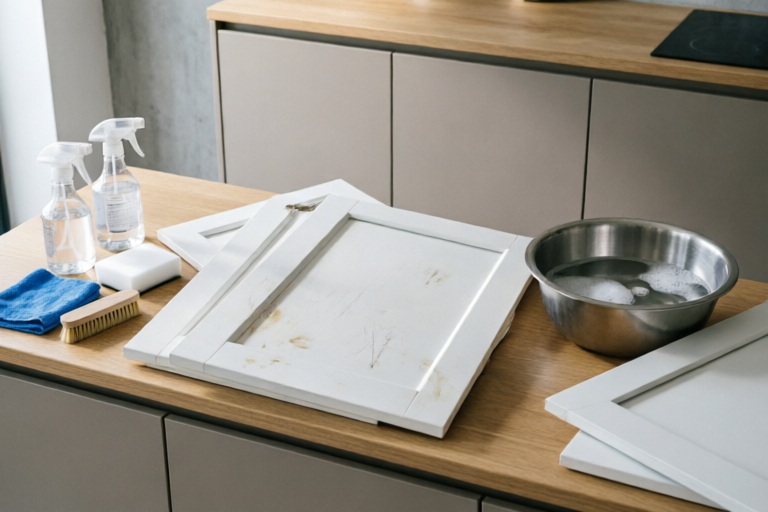
Essential Supplies Checklist
Before opening the first cabinet door, gather the following supplies:
- Vacuum Cleaner with Brush Attachment: Crucial for removing loose debris from corners, hinges, and tracks without scratching surfaces.
- Microfiber Cloths: These capture more dust and grime than traditional rags and are lint-free.
- Soft-Bristled Brushes: Ideal for scrubbing intricate details, molding, and handles where cloths cannot reach.
- Eco-Friendly Degreaser or Vinegar Solution: Choose a cleaner safe for your specific cabinet material (wood, laminate, or painted).
- Spray Bottles: For applying cleaning solutions evenly.
- Bucket of Warm Water: Essential for rinsing cloth sponges.
- Gloves and Mask: Protect your hands from harsh chemicals and avoid inhaling dust or allergens released during cleaning.
- Shelf Liners (Optional): Adhesive-free paper or rubber mats to protect the interior once clean.
The Art of Emptying and Sorting
To fully expose interior surfaces, you must empty the cabinets. Start by taking everything out onto a kitchen island or large table. Do this cabinet by cabinet to maintain some semblance of order.
Step 1: Categorization. Group items by type (e.g., baking supplies, canned goods, dinnerware). This helps you visualize the inventory.
Step 2: Purge. While sorting, check expiration dates. Discard old spices, dried-out pasta, or any food items past their prime. Also, toss duplicate items or things you haven’t used in over a year.
Step 3: Wash Dishes First. If you find dirty dishes in your cupboards, wash them immediately before returning them to the clean space.
Step 4: Surface Wipe-Down. Once empty, inspect the plastic or glass items themselves. Give them a quick wipe before storage if they have visible grime. This ensures you aren’t transferring dirt onto your newly cleaned cabinets.
This phase is also the perfect opportunity to assess whether your current cabinet configuration makes sense. Are heavy pots on high shelves? Is rice stored next to coffee beans, risking cross-contamination of scents? Use this downtime to restructure your inventory logically.
3. Cleaning Phase: Vacuuming, Degreasing, and Sanitizing
With the cabinets emptied, you can now tackle the grime hidden behind closed doors. This phase requires patience and attention to detail, as different materials react differently to moisture and chemicals.
Dry Cleaning: Removing Debris
Start with dry methods before introducing any liquid. Wetting a dusty surface only creates mud that smears across the finish.
- Vacuuming: Attach the brush nozzle to your vacuum. Gently vacuum the interior of every shelf, the corners of drawers, and the top of the cabinet frame. Pay special attention to the track channels in soft-close drawers, where crumbs often lodge.
- Brushing: Use your soft-bristled brush to knock dust down from crevices, handle mounts, and decorative molding. Wipe the dislodged dust away with a dry microfiber cloth.
Tackling Grease and Sticky Residue
Kitchens are prone to grease splatters, particularly in cabinets near the stove. A common mistake is using abrasive scouring pads, which can strip varnish or scratch laminate. Instead, opt for gentle but effective solutions.
The Baking Soda Paste Method: Mix baking soda with a small amount of water to form a paste. Apply this to sticky labels, gum, or hardened food spills. Let it sit for 10 minutes to soften the adhesive, then gently rub with a sponge. Baking soda is mildly abrasive enough to lift grime but safe for most finished woods.
The Degreaser Spray: For general grease buildup, use a commercial degreaser diluted according to bottle instructions, or a homemade mix of warm water and dish soap. Spray generously onto a microfiber cloth rather than directly onto the cabinet. Spraying directly can lead to moisture seeping into joints or seams, potentially warping the wood or damaging the glue.
Wiping Technique: Clean from the top of the interior downwards. Gravity pulls dirty water downward, so starting at the top ensures you don’t drag grime onto areas you have already cleaned.
Sanitizing and Disinfecting
Cleaning removes dirt, but sanitizing kills germs. Since you store food nearby, disinfection is vital.
- Wood Cabinets: Avoid bleach on porous wood as it can discolor the finish. Instead, use a mixture of equal parts water and rubbing alcohol, or hydrogen peroxide. Spray lightly on a cloth and wipe. These agents evaporate quickly, reducing the risk of moisture damage.
- Laminate or Painted Cabinets: You have more flexibility here. A dilute bleach solution (1 tablespoon per gallon of water) can be used effectively on sealed laminate. Test on a hidden area first to ensure colorfastness.
- Hinges and Hardware: Remove the hardware if possible for soaking. Clean behind knobs and handles where finger oils accumulate. Use an old toothbrush to clean around screw holes.
Material-Specific Care Guidelines
Oil-Finished Wood: After cleaning and drying, apply a light coat of furniture wax or lemon oil to nourish the wood and repel future moisture.
Glossy Finishes: Use a dedicated polish to prevent streaking. Streaks on glossy paint look worse than dust.
Unfinished/Porous Wood: Minimize water usage. Use a damp cloth followed immediately by a dry cloth.
4. Recovery: Drying and Organized Restocking
Cleaning the cabinets is only half the battle. How you dry and restock them determines the longevity of your work. Improper drying can lead to water spots or mold growth under the shelf lining.
Proper Drying Techniques
Avoid letting air-dry alone, as stagnant moisture can be trapped against the wood grain. Immediately after wiping with a damp cloth, use a dry microfiber towel to buff the surfaces dry. This action also polishes the finish and leaves a protective shine.
Airflow: Leave all cabinet doors and drawers open for at least 30 minutes after finishing the cleaning session. Good circulation ensures any remaining humidity dissipates completely. If the weather is humid, consider using a fan or dehumidifier in the room for extra protection.
Installing Shelf Liners
Now is the time to place your liners. Shelf liners serve two purposes: they catch spills for easy cleanup and protect the cabinet floor from scratches caused by moving dishes.
- Contact Paper: Good for high-gloss finishes. Peel-and-stick varieties adhere securely and come in various patterns.
- Non-Abrasive Fabric Liners: Best for preventing ceramic plates from chipping when moved.
- Rubber Mats: Useful for drawers to keep items from sliding around and creating noise.
Measure your shelves accurately and trim the liner to fit. Do not overlap pieces inside a single drawer or shelf, as this can trap moisture underneath. Secure the liner edges firmly to prevent curling.
Efficient Restocking Strategies
Organized restocking maximizes accessibility and minimizes clutter, making future maintenance easier.
Zoning Your Storage
Organize items based on workflow zones.
- Cooking Zone: Store pots, pans, spices, and utensils near the stove.
- Cleaning Zone: Keep trash bags, sponges, and laundry detergent near the sink and dishwasher.
- Pantry Zone: Store dry goods, flour, sugar, and cereal together.
Visibility and Accessibility
Place heavier items on lower shelves to prevent tipping hazards and strain when reaching up. Lighter items, like bowls or lightweight containers, belong on higher shelves. Use stackable organizers or lazy Susans for round bottles or jars to utilize corner space effectively.
Labeling
If you store bulk items in unmarked containers (like rice, oats, or snacks), label them clearly. A permanent marker or printed stickers prevent guesswork. This also helps guests know where items are located without rummaging.
5. Conclusion: Establishing a Long-Term Cleaning Routine
Deep cleaning your kitchen cabinets is a periodic marathon, not a sprint. By summarizing key takeaways and establishing a sustainable maintenance routine, you can keep your kitchen fresh and functional over time without the overwhelming stress of a massive overhaul every year.
Key Takeaways
- Safety First: Always wear gloves and test cleaners on inconspicuous areas.
- Top-Down Approach: Never skip the vacuuming step before wet cleaning to avoid mud creation.
- Material Matters: Respect the finish; wood needs less moisture than laminate.
- Dry Thoroughly: Prevent warping and mold by ensuring zero moisture retention.
Suggested Cleaning Schedule
To maintain the results you worked hard to achieve, implement a tiered cleaning schedule:
- Weekly: Wipe down the exterior of cabinet fronts and handles. Remove fingerprints and splashes near the stove immediately.
- Monthly: Vacuum the tops of cabinets (where dust collects outside). Check for sticky spills on interior shelves if you notice crumbs dropping from above.
- Annually: Perform the full deep clean outlined in this guide. Remove items, scrub interiors, sanitize, and restock.
Maintaining a clean kitchen is an investment in your home’s health and resale value. When your cabinets gleam and smell fresh, they reflect pride in your craftsmanship. Whether you cook elaborate meals daily or simply use the kitchen for quick lunches, a clean cabinet system ensures that every interaction with your food is safe, efficient, and enjoyable. Start today by grabbing your microfiber cloth and transforming your kitchen storage from hidden neglect to a shining asset of your home.
By following these steps, you ensure that your kitchen remains a hygienic sanctuary. Remember, consistency is key; a little bit of effort done regularly saves hours of deep cleaning later. Happy cleaning!
Comments

switched to essential oil cleaner instead of bleach. Smells better and same result on germs apparently.

loved the organization tips at the end. finally know where the spare plates go again. great read!
did everyone use hot water? i used warm because the instructions weren't super clear on temp
pro tip: put a towel down before removing everything! saved my floor from dropping a heavy cereal box 😅

holy cow there is so much stuff hiding in here lol. took me 3 hours but feels amazing now. definitely doing this every 6 months

quick question though, will baking soda scratch any veneer finish? i have older cabinets and don't want to ruin them
just finished mine! the vinegar spray worked wonders on the sticky handles. thanks for not skipping the drying step!