Cleaning & Organization
How to Clean Your Kitchen Sink and Remove Stubborn Stains Fast
Shine Brighter, Live Cleaner
How to Clean Your Kitchen Sink and Remove Stubborn Stains Fast
H2: Introduction: Why Regular Sink Cleaning Matters
H3: The Often-Neglected Hub of Hygiene
In the hustle of daily life, the kitchen serves as the beating heart of the home, a space dedicated to nourishment, creativity, and gathering. Yet, within this vital room, one surface frequently bears the brunt of activity yet rarely receives the attention it deserves: the kitchen sink. While we meticulously wipe down countertops and scrub stovetops, the sink often remains overlooked until visible crust builds up or unpleasant odors arise. However, neglecting the sink is not merely an aesthetic oversight; it is a potential health hazard.
H3: Understanding the Bacterial Risk
Scientific studies have repeatedly shown that kitchen sinks harbor significantly more bacteria than many other household items. After all, the sink is where we wash raw meat, vegetables, and unwashed fruits. It is also where we place sponges soaked in food particles. If the sink isn’t cleaned regularly, these elements create a perfect breeding ground for pathogens such as E. coli, Salmonella, and listeria. Unlike a toilet bowl, which we instinctively disinfect because we know it contains waste, the kitchen sink handles our food directly. Cross-contamination is real; if you handle food prep items without sanitizing your workspace, including the basin where you washed those items, you risk introducing bacteria to your meals.
H3: Impact on Food Safety and Home Wellness
A dirty sink affects more than just germs. It influences the overall scent of your kitchen. Standing water trapped in the drainer basket or sticky residue around the drain rim creates a musty smell that permeates the air. Furthermore, persistent stains can degrade the appearance of expensive fixtures, leading to premature wear. Regular cleaning ensures that the environment remains safe for children preparing snacks and adults cooking complex meals. By prioritizing sink cleanliness, you uphold a standard of hygiene that protects your family’s physical well-being and maintains the integrity of your kitchen investment.
H2: Required Tools and Eco-Friendly Cleaning Solutions
H3: Building Your Cleaning Arsenal
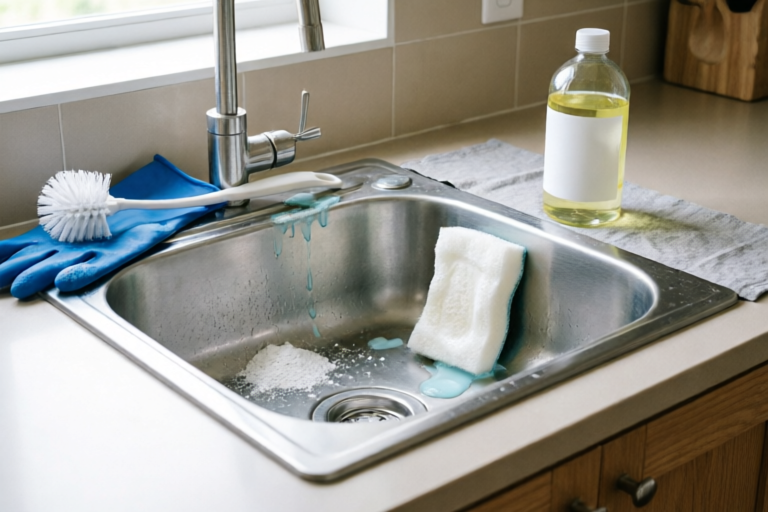
To achieve a thorough clean without relying on harsh chemicals, you only need a few essential tools. First, acquire a high-quality pair of rubber gloves. This is crucial not only for protection against bacteria but also to prevent skin irritation from prolonged contact with cleaning agents or hot water. Next, invest in a set of microfiber cloths. Unlike traditional rags that trap dirt and distribute it across surfaces, microfiber has electrostatic properties that attract dust and grime effectively. You will also need a non-abrasive sponge or a soft-bristled brush specifically designated for the sink area. Abrasive scouring pads should be avoided as they can scratch polished finishes.
H3: The Power of Baking Soda and Vinegar
For an eco-friendly approach, your pantry holds the secrets to the most effective cleaning solutions. Baking soda (sodium bicarbonate) is a mild abrasive that helps lift dirt without scratching. It is also alkaline, which helps neutralize acidic spills and odors. White vinegar acts as a natural acid, dissolving mineral deposits, grease, and soap scum. When mixed, they react to create carbon dioxide bubbles, which helps mechanically dislodge gunk from the corners of the sink. For a stronger disinfectant, consider diluting hydrogen peroxide with water or using essential oils like tea tree oil, which possess antifungal and antibacterial properties. These ingredients are inexpensive, readily available, and environmentally safe compared to bleach-based commercial products.
H3: Choosing the Right Cloth and Scrubbing Pad
The material of your sink dictates the tools you should choose. For stainless steel sinks, soft nylon brushes or non-scratch sponges are ideal to avoid micro-scratches where grime can settle later. For porcelain or ceramic basins, you can tolerate a slightly firmer sponge, but always test a small area first. Composite granite sinks require very gentle handling; never use steel wool or wire brushes, as they can permanently dull the resin finish. A microfiber cloth is universally useful for drying the surfaces after washing, ensuring no water spots are left behind. Organize these supplies near the sink so that you are encouraged to clean immediately after usage rather than postponing the task.
H2: Step-by-Step Process for Fast Surface Cleaning
H3: Preparation Phase: Clearing Debris
Before applying any chemical solution, preparation is key. Remove all items from the sink, including pots, pans, utensils, and any existing dishware stored underneath. Check the drainer basket located in the drain opening. Often, hair, food particles, and sludge accumulate here, causing clogs and bad odors. Remove this basket manually and discard the debris into the trash. If the garbage disposal unit is present, run it briefly with cold water to flush out loose debris from the grinding chamber. This step ensures that the surface you are about to clean is free of obstruction, allowing the cleaner to work directly on the sink material.
H3: Rinsing and Initial Treatment
Start by rinsing the entire sink basin with warm or hot water. Hot water is superior to cold for this step because it melts fats and loosens dried-on food particles. As the water runs, visually inspect the basin for obvious buildup areas. Focus your initial spray on the sides and corners, which are typically harder to reach. Once wet, sprinkle a generous layer of baking soda over the entire surface of the sink, including the faucet and handles. Use your hand or a spatula to rub the powder around, creating a light paste. Do not add water yet; you want the baking soda to adhere to the damp surface.
H3: Application and Scrubbing Technique
Next, saturate a paper towel or a rag with white vinegar. Lay this soaked towel directly onto the walls of the sink and leave it there for five to ten minutes. The vinegar needs time to dissolve the minerals and break down the adhesion of grime. After the soaking period, remove the towel. Using your non-abrasive sponge, begin scrubbing the baking soda paste. Work in circular motions, following the grain if you have a stainless steel sink to prevent streaking. Pay special attention to the area under the faucet and the rim where the countertop meets the sink. These are high-contact zones for bacteria and grease. Use a soft toothbrush to scrub the tiny crevices around the drain and faucet base where larger sponges cannot reach.
H3: Final Rinse and Inspect
Once scrubbing is complete, take the hose attachment or cup of hot water and rinse the sink thoroughly. Flush down the drain to ensure no residue remains, which could cause slippery surfaces or future buildup. Wipe the sink dry immediately with a clean microfiber cloth. Look at the surface from different angles of light. If you see streaks or spots, repeat the rinsing process or touch up specific areas with a damp cloth. Inspect the drain stopper mechanism; if it feels stiff or smells, it may need a separate soak in vinegar overnight. Proper drying prevents water spots and reduces the chance of mineral accumulation.
H2: Specialized Techniques for Stubborn Stains and Rust
H3: Tackling Hard Water Mineral Deposits
In areas with hard water, calcium and magnesium build-up can form a white, chalky film known as limescale. This is notoriously difficult to remove with regular soap. To combat this, mix equal parts distilled white vinegar and hot water in a spray bottle. Spray heavily on the affected areas and let it sit for at least twenty minutes. For severe cases, boil water with added vinegar and pour it gently into the sink. Be cautious with marble or stone composite sinks, as acid can etch the surface. In those cases, use a specialized stone-safe cleaner designed for descaling. Repeat the process until the white haze disappears completely.
H3: Removing Grease Buildup Effectively
Over time, cooking oils and aerosolized fat from frying can coat the sink walls. A thick, yellowish film indicates heavy grease accumulation. Standard baking soda may not cut through this alone. Try a solution of two tablespoons of liquid dish soap mixed into half a cup of baking soda. Apply this paste and let it sit for thirty minutes. The surfactants in the dish soap emulsify the grease, lifting it from the surface. Scrub vigorously with a medium-stiffness brush. For older grease films, steam can be incredibly effective. Run boiling water down the drain first to heat the plumbing, then immediately scrub the sink with the soap-paste mixture while it is still warm.
H3: Eliminating Rust Spots Without Damaging Finish
Rust spots in a stainless steel sink are common, especially if the water supply is rich in iron or if metal utensils rust in the basin. Never use steel wool, as it leaves metal filings that oxidize faster. Instead, create a paste using baking soda and water, then dip a cotton ball in lemon juice. Rub the rust spot gently with the citrus-soaked cotton ball. The citric acid helps dissolve the iron oxide. If the rust persists, use a product specifically formulated for rust removal on stainless steel, such as Bar Keepers Friend. Always follow the manufacturer’s instructions regarding dwell time to avoid damaging the protective chromium layer of the steel.
H3: Treating Staining from Acidic Foods
Cutting lemons, onions, or tomatoes directly over the sink can lead to dark stains if not rinsed promptly. Citrus acids can discolor certain metals, while tomato dyes can tint porous sinks. For organic stains, rely on the oxidation power of hydrogen peroxide. Pour a small amount onto a cotton pad and dab the stain. Let it bubble for a minute, then rinse. For stubborn coffee or tea rings, mix cream of tartar with hydrogen peroxide to form a paste. Apply to the ring, let it sit, and gently scrub. Remember that prevention is better than cure; rinsing the sink immediately after processing acidic foods prevents penetration into the microscopic pores of the surface.
H2: Conclusion: Drying and Preventative Habits
H3: The Importance of Drying the Basin
After every meal preparation, take a moment to wipe down the sink. Water spots are essentially mineral deposits left behind after evaporation. If left unchecked, they build up over months, becoming difficult to scrub off. Using a dry microfiber cloth to buff the sink dry not only removes moisture but also polishes the surface, enhancing shine and reducing friction. This habit takes only seconds but pays dividends in reduced cleaning effort weeks later. Think of it as a daily ritual, similar to wiping your car keys or cleaning your glasses. Consistency turns maintenance into a minor task rather than a major chore.
H3: Establishing a Maintenance Schedule
While a daily wipe-down keeps the sink presentable, a deeper clean should happen once a week. Dedicate Sunday mornings to cleaning the garbage disposal, the faucet aerator, and the overflow channel. Running ice cubes and rock salt through the disposal can help sharpen blades and clean the interior pipe walls. Also, clean the sprayer head by unscrewing it and soaking it in vinegar to unclog nozzle holes. On a monthly basis, perform a thorough disinfection using an antibacterial spray suitable for kitchen surfaces. Creating a schedule helps you maintain control over the condition of your kitchen rather than reacting to messes as they pile up.
H3: Summary of Key Takeaways
Cleaning your kitchen sink effectively requires the right combination of natural ingredients, appropriate tools, and consistent habits. By understanding the bacterial risks associated with dirty surfaces, you can motivate yourself to maintain a hygienic environment. Utilize eco-friendly solutions like baking soda and vinegar to save money and the planet while achieving excellent results. Target specific stains like rust or limescale with specialized treatments, ensuring you protect the material integrity of your fixture. Finally, adopt preventative measures such as immediate drying and weekly maintenance to minimize future deep-cleaning needs. With these practices, your kitchen sink will remain a sanitary, sparkling centerpiece of your home, ready for every culinary challenge.
H2: Frequently Asked Questions
H3: Can I use Clorox Bleach on My Sink?
Yes, chlorine bleach can be used on stainless steel and porcelain sinks to disinfect, but it should be used with caution. Mix one tablespoon of bleach per gallon of water. Rinse thoroughly afterward as bleach fumes are harmful and residues can irritate skin. Do not mix bleach with vinegar or ammonia, as this creates toxic gas. For regular maintenance, vinegar is a safer and equally effective alternative.
H3: Why Does My Sink Smell Even After Cleaning?
A lingering smell usually indicates bacteria growth in the drain pipe rather than the surface. Ensure you scrub the rubber seal around the drain stopper, as food gets trapped there. Pour a mixture of baking soda followed by vinegar down the drain, then flush with boiling water once an hour to clear the pipe. Doing this monthly prevents septic buildup in the P-trap.
H3: Will Scrubbing Damage My Stainless Steel?
Only if you use the wrong tool. Wire brushes or coarse steel wool will ruin the protective finish. Stick to soft nylon brushes, non-scratch sponges, or microfiber cloths. Always scrub in the direction of the grain lines on the metal to maintain the sleek, uniform look.
H3: Is It Better to Clean Before or After Cooking?
Ideally, clean immediately after cooking but before putting away plates. If you cook with a messy sink, you are likely tracking germs via your hands and clothes to other surfaces. Cleaning while the grime is fresh is exponentially easier than removing hardened residue the next day. A quick rinse and dry takes less time than a deep scrub hours later.
H2: Environmental and Financial Benefits
Choosing eco-friendly cleaning solutions extends beyond personal health. Traditional chemical cleaners often contain phosphates and synthetic fragrances that can contaminate water systems when washed down the drain. Baking soda and vinegar are biodegradable and safe for local ecosystems. Furthermore, utilizing these pantry staples reduces household spending significantly. Over the course of a year, switching from industrial cleaners to natural remedies can save dozens of dollars. Additionally, extending the lifespan of your sink fixtures by avoiding corrosive chemicals ensures that you won’t need to replace them prematurely, offering financial savings on renovations in the long run.
H2: Final Thoughts on Kitchen Care
The kitchen sink is more than a utility; it is a statement of care for your household. A clean sink reflects a disciplined approach to home management and a respect for shared living spaces. By integrating these cleaning strategies into your routine, you transform a mundane chore into a satisfying act of care. Whether you reside in a compact apartment or a spacious family home, the principles of sanitation and maintenance remain universal. Embrace the journey toward a sparkling, germ-free sink, knowing that you are contributing to a healthier, fresher, and more beautiful home environment. Let the sink be the foundation upon which your culinary creations are built safely and hygienically, reflecting pride in every drop and every plate.
Comments

BudgetClerk
simple & effective. saved me calling a plumber for once hahaha
👍 3👎 0

CleanFreak_88
drying it is key, i used to leave water in there and it spots up instantly. thanks for the tip
👍 0👎 0

ChemWiz
good read but i wish you mentioned what chemicals NOT to mix with vinegar sometimes
👍 7👎 0

MomsDaily
tried the salt scrub step, took like 10 mins but that rust stain under the tap is finally gone!
👍 4👎 0

HomeRenoTom
quick q - is steel wool safe for the faucet or just rough spots? dont want to scratch
👍 2👎 0
SparkleQueen
literally worked wonders. my stainless steel looks brand new again lol
👍 9👎 0