How to Fix a Leaky Faucet in 5 Steps
DIY Plumbing Solutions Made Easy
Introduction to Fixing a Leaky Faucet
A leaky faucet is not only an annoyance but can also lead to higher water bills and potential water damage if left unattended. Promptly addressing the issue can prevent more significant problems down the road. In this guide, we'll walk you through a step-by-step process to fix a leaky faucet, ensuring it's done correctly and efficiently.
Importance of Addressing Leaky Faucets Promptly
A dripping faucet might seem like a minor inconvenience, but over time, it can waste a considerable amount of water. According to the Environmental Protection Agency (EPA), a single leaking faucet can waste up to 3,000 gallons of water per year. This not only increases your water bill but also puts unnecessary strain on local water supplies.
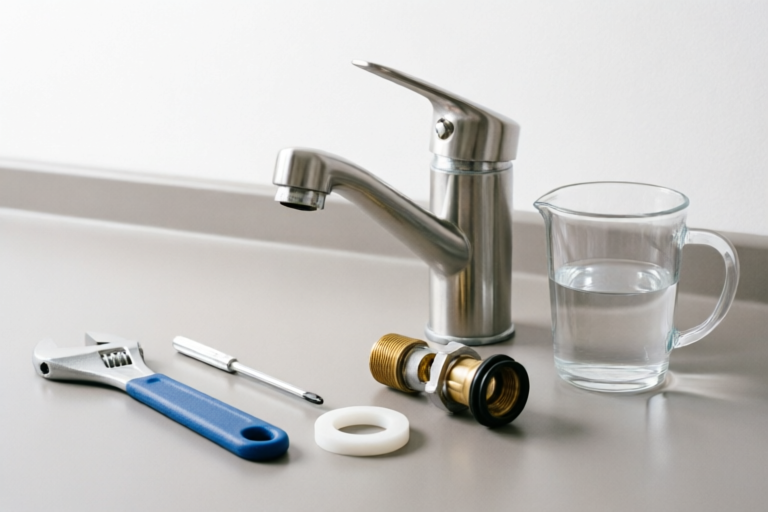
Overview of Tools and Materials Needed for Repair
To tackle this project, you'll need some basic tools and materials:
- Adjustable wrench or Allen key
- Phillips and flathead screwdrivers
- Plumber's tape or Teflon tape
- Replacement parts, such as O-rings, washers, and seals
- Bucket or bowl to catch any water
- Rubber gloves for protection
Step 1: Turn Off Water Supply
The first step in fixing a leaky faucet is to ensure that no water flows through the pipes while you work. This prevents any accidental flooding and makes the repair process safer.
Locate and Shut Off the Water Supply to the Faucet
Most homes have a dedicated shutoff valve under the sink. If you can't find it there, check the main water supply line, which is typically located near the water heater or outside the house. Once you've found the valve, turn it clockwise to shut off the water.
Drain Remaining Water from Pipes
After turning off the water supply, open the faucet to drain any remaining water from the pipes. This ensures that there's no water left in the system when you start disassembling the faucet.
Step 2: Identify the Type of Faucet
There are several types of faucets, each with its own design and repair requirements. Identifying the correct type is crucial for choosing the right replacement parts and tools.
Differentiate Between Compression, Ball, Cartridge, and Ceramic Disk Faucets
Here’s a quick breakdown of the most common types of faucets:
- Compression Faucets: These use a washer and a stem to control water flow. They're often found in older homes.
- Ball Faucets: Featuring a single rotating ball inside the faucet, these are popular for their durability and ease of repair.
- Cartridge Faucets: Designed with a cylindrical cartridge that controls water flow, these faucets are easy to maintain.
- Ceramic Disk Faucets: Using two disks stacked together to regulate water flow, these are known for their longevity and resistance to mineral buildup.
Tips on How to Diagnose the Specific Type of Your Faucet
If you're unsure about the type of faucet you have, look for visible components such as handles, spouts, and internal mechanisms. You can also consult the manufacturer’s documentation or search online for images of different faucet types.
Step 3: Disassemble the Faucet
Once you've identified the type of faucet and ensured the water supply is off, it's time to begin disassembly. Be careful during this process to avoid damaging any components.
Remove Handle and Trim Pieces Carefully
Start by removing the handle and any decorative trim pieces using the appropriate screwdriver. Some handles may require an Allen key or a special tool provided by the manufacturer. Once the handle is removed, you'll be able to access the internal components.
Examine Internal Components for Wear or Damage
Inspect the internal parts for signs of wear, such as worn-out washers or damaged O-rings. Look for any cracks, corrosion, or debris that could be causing the leak. Taking detailed notes at this stage will help you identify which parts need replacement.
Step 4: Replace Faulty Parts
With the faulty components identified, it's time to replace them. This step is critical to ensure that the repair is effective and long-lasting.
Common Parts That May Need Replacement (e.g., O-rings, Washers)
The most common parts that cause leaks in faucets include:
- O-rings: These rubber rings create a watertight seal around moving parts.
- Washers: Found in compression faucets, these small metal discs help control water flow.
- Seals: Used in cartridge and ceramic disk faucets, these ensure a tight fit between components.
Detailed Instructions on Installing New Parts Correctly
When installing new parts, follow these guidelines:
- Ensure all surfaces are clean and dry before applying plumber's tape.
- Apply a thin layer of plumber's tape to threads to prevent leaks.
- Install the new part according to the manufacturer's instructions, ensuring it fits snugly.
- Use a wrench to tighten the component, but avoid overtightening, which can cause damage.
Step 5: Reassemble and Test the Faucet
After replacing the faulty parts, it's time to put everything back together and test the faucet to ensure it's functioning properly.
Reattach All Components Securely
Begin by reattaching the internal components, making sure they are aligned correctly. Then, reinstall the handle and any decorative trim pieces. Use screws and bolts to secure everything tightly.
Check for Leaks and Proper Functionality After Reassembly
Turn the water supply back on and check for leaks around the faucet and pipes. Run the water and verify that it flows smoothly without any drips or unusual noises. If everything checks out, you've successfully fixed the leaky faucet!
Conclusion: Maintaining Your Fix
While repairing a leaky faucet can save you money and prevent water waste, it's important to take steps to maintain the repair and prevent future leaks.
Tips for Preventing Future Leaks
Regular maintenance is key to keeping your faucet in good working order:
- Periodically check for loose connections and tighten them as needed.
- Flush the aerator regularly to remove mineral deposits.
- Replace worn-out parts before they become a problem.
When to Call a Professional Plumber if Issues Persist
If you've followed these steps and the faucet still leaks or doesn't function properly, it may be time to call a professional plumber. Complex issues, such as damaged pipes or improper installation, are best handled by experts who have the necessary tools and experience.
Comments

Good overview, but make sure you check for mineral buildup too!

This is awesome! My first time fixing a faucet and it worked. Thanks!

I followed every step but still have a small leak. Any tips?

Saved so much money by doing this myself. Super helpful article!
Great guide! Just wanted to add that WD-40 helps loosen stubborn handles.

Step 2 was a bit confusing. How exactly do I tell if it's a compression or ball type?

Worked like a charm! Drained the pipes and replaced the washer. No more drip. Thanks!