Step-by-Step Guide to Installing a New Ceiling Fan
Install Your Ceiling Fan Like a Pro
### Step-by-Step Guide to Installing a New Ceiling Fan
1. Introduction to Ceiling Fan Installation
Overview of the Benefits of Ceiling Fans: Ceiling fans are not only stylish but also energy-efficient. They help circulate air, reducing the reliance on air conditioning during warmer months and improving overall indoor comfort. Additionally, they can enhance the aesthetics of any room, adding a touch of elegance to your home.
Importance of Proper Installation for Safety and Efficiency: Proper installation is crucial for both safety and optimal performance. Incorrect installation can lead to electrical hazards, reduced efficiency, and even damage to the fan itself. By following this guide, you'll ensure that your ceiling fan is installed correctly, providing years of reliable service.
2. Preparing for Installation
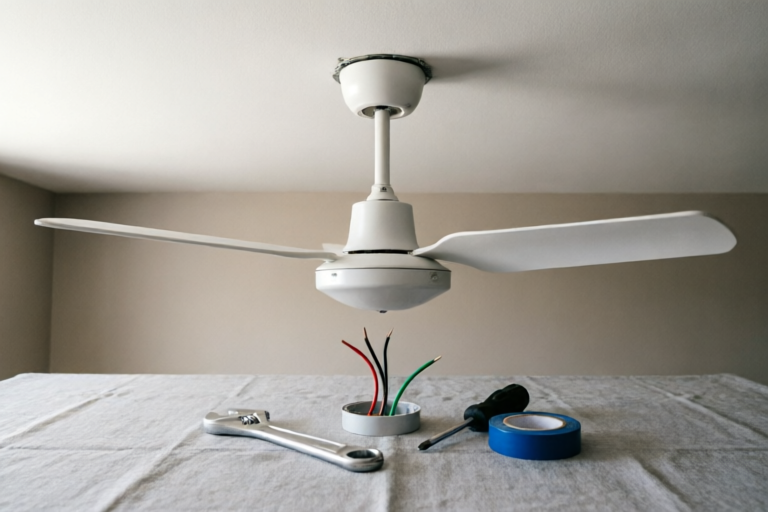
Gathering Necessary Tools and Materials: Before you start, make sure you have all the required tools and materials. These typically include:
- Phillips and flathead screwdrivers
- Wrenches
- Wire strippers
- Electrical tape
- Wire nuts
- Ceiling fan installation kit (usually included with the fan)
Checking Electrical Requirements and Wiring Diagrams: Ensure that your electrical system meets the requirements for the ceiling fan. Check the power supply, circuit breaker, and wiring diagrams provided by the manufacturer. This will help prevent any potential electrical issues during installation.
Ensuring Safety Precautions Are in Place: Turn off the power at the main circuit breaker to avoid any electrical hazards. Use a voltage tester to confirm that the power is off before proceeding. Wear appropriate protective gear, such as gloves and safety glasses, to protect yourself during the installation process.
3. Removing the Old Fixture (if applicable)
How to Safely Disconnect the Old Fixture from the Electrical System: If you're replacing an existing ceiling fan or light fixture, begin by disconnecting it from the electrical system. Use a screwdriver to remove the screws holding the fixture in place. Carefully pull down the fixture and disconnect the wires. Make sure to mark the wire connections for easy reconnection later.
Steps for Removing the Existing Light or Fan Assembly: Once the fixture is disconnected, carefully remove any screws or bolts securing the fan or light assembly to the ceiling. Gently lower the assembly to the floor, being careful not to damage any components. If the assembly includes a light kit, disconnect the light fixture as well.
4. Mounting the Ceiling Fan Bracket
Detailed Instructions on Securing the Mounting Bracket to the Ceiling: The first step in mounting the ceiling fan bracket is to locate the joists in your ceiling. Use a stud finder to identify the best location for the bracket. Align the bracket with the center of the joist and mark the screw holes. Drill pilot holes and use long screws to secure the bracket firmly to the ceiling. Ensure that the bracket is securely attached and level.
Tips for Ensuring the Bracket Is Level and Secure: Use a level to check that the bracket is perfectly horizontal. If it's not level, adjust the bracket until it is. Tighten all screws securely to prevent any wobbling or movement once the fan is installed. Double-check that the bracket is stable before proceeding to the next step.
5. Assembling and Attaching the Ceiling Fan
\nInstructions for Assembling the Fan Blades and Motor Unit: Start by unpacking the ceiling fan and its components. Follow the manufacturer's instructions to assemble the fan blades. Attach each blade to the motor unit using the provided screws. Ensure that the blades are evenly spaced and tightened securely. Next, attach the motor unit to the mounting bracket. Use the screws provided in the installation kit to secure the motor unit to the bracket.
Connecting the Fan Motor to the Mounting Bracket: Once the motor unit is secured, connect the wires from the ceiling box to the corresponding wires on the fan motor. Typically, there will be three wires: black (hot), white (neutral), and green or bare (ground). Use wire nuts to connect the matching colored wires together. Ensure that all connections are tight and secure. Finally, attach the canopy cover over the junction box to hide the wiring and provide a clean finish.
6. Wiring the Ceiling Fan
Detailed Steps for Connecting Wires Safely and Correctly: Carefully strip the insulation from the ends of the wires to expose about half an inch of copper wire. Connect the black (hot) wire from the ceiling box to the black (hot) wire on the fan motor. Similarly, connect the white (neutral) wires and the green or bare (ground) wires. Use wire nuts to secure each connection. Tuck the wires back into the junction box and cover them with the canopy.
Troubleshooting Common Wiring Issues: If the fan doesn't work after installation, check the following:
- Ensure that the circuit breaker is turned on.
- Verify that all wires are properly connected and secure.
- Check that the fan switch is in the correct position.
- Inspect the wiring for any loose connections or damaged wires.
7. Final Checks and Finishing Touches
Testing the Fan for Proper Operation: Once everything is connected, turn the power back on at the main circuit breaker. Test the fan by turning the switch on. Ensure that the fan operates smoothly and that the direction of rotation is correct. Adjust the fan speed if necessary.
Adjusting Fan Settings and Cleaning Up the Workspace: After confirming that the fan works properly, set the desired fan speed and direction. Clean up any tools and materials used during the installation. Dispose of any packaging materials responsibly. Take a moment to admire your newly installed ceiling fan and enjoy the improved airflow and aesthetics it brings to your space.
8. Conclusion: Enjoying Your New Ceiling Fan
Summary of Key Points Covered in the Guide: In this guide, we've covered the essential steps for installing a new ceiling fan, including preparing for installation, removing the old fixture, mounting the bracket, assembling and attaching the fan, wiring the fan, and conducting final checks. By following these steps, you've ensured a safe and efficient installation.
Additional Tips for Maintaining and Optimizing Your New Ceiling Fan: To keep your ceiling fan running smoothly, clean the blades regularly to prevent dust buildup. Check the fan's balance periodically to ensure smooth operation. Consider using a remote control for convenience, and explore different fan settings to find the perfect airflow for your space. With proper maintenance, your ceiling fan will continue to provide comfort and style for many years to come.
Comments

Added some extra insulation around the wiring. Made the whole setup more efficient. Good guide though!

Short and sweet. Got my fan installed without any issues. Exactly what I needed.

Super helpful! I was worried about the wiring part but your guide made it easy. Would recommend to anyone.

Followed all the steps carefully. My fan is now spinning smoothly. Thanks for the detailed wiring section!
I used a different bracket mounting method suggested by a friend. It worked better for my ceiling. Might wanna add that as an alternative.

Great guide! Just one question - do I really need to turn off the power before disconnecting the old fixture?

Worked like a charm! Took me a bit longer than expected but totally worth it.