## Introduction and Necessary Preparations
Owning a home involves countless responsibilities, but few household tasks feel as demanding as keeping soft furnishings pristine. Over time, carpets accumulate dust, allergens, invisible dirt, and unsightly spots that diminish both the aesthetic appeal and air quality of your living space. While many homeowners rush to purchase or rent specialized carpet cleaning machines, the reality is that effective, thorough cleaning is entirely possible without investing in expensive equipment. Manual carpet cleaning offers distinct advantages beyond just financial savings. By managing the process yourself with basic supplies, you maintain greater control over the chemicals used, ensure targeted attention to high-traffic areas, and reduce unnecessary water usage that automated machines often require.
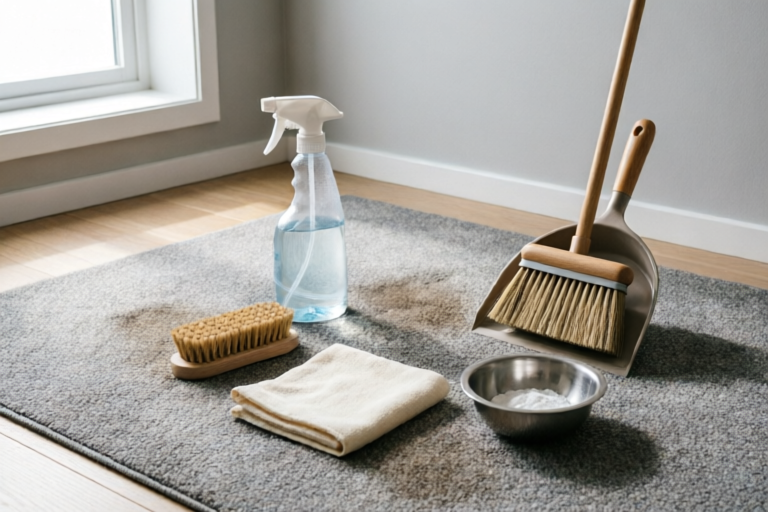
Before diving into the cleaning process, gathering the right tools is crucial for efficiency. You do not need professional-grade extractors; rather, common household items are sufficient for achieving excellent results. Start with a sturdy vacuum cleaner to remove loose debris before applying any liquid. Next, prepare several clean, absorbent microfiber cloths or old cotton t-shirts. Microfiber is particularly effective at trapping particles and drawing moisture away from fibers. You will also need two buckets—one filled with warm water and another designated for rinsing to prevent dirty water from spreading back onto the carpet. White vinegar, baking soda, mild dish soap, a stiff-bristled brush for agitation, and a blunt-edged scraper are essential components of your toolkit.
Safety and preparation are paramount. Always check the care label on your carpet manufacturer recommendations before testing any solution. Different fiber types, such as wool versus synthetic nylon, react differently to moisture and alkalinity. Perform a spot test in an inconspicuous area, like a closet corner, to ensure the cleaning solution does not cause discoloration or damage. Once you are confident in your materials, clear the room of furniture where possible. If heavy items cannot be moved, cover their legs with aluminum foil or plastic bags to prevent contact with damp flooring. Proper preparation sets the stage for a successful cleaning session that leaves your home smelling fresh and looking revitalized.
## Quick Response to Accidental Spills
Time is the most critical factor when dealing with fresh carpet stains. The longer a spill sits, the deeper the pigment penetrates the fiber and backing, making removal exponentially more difficult. Whether it is a dropped beverage, muddy paw prints, or a spilled meal, immediate intervention can salvage the appearance of your carpet. The fundamental rule of stain removal is to blot, never rub. Rubbing pushes the liquid deeper into the base of the carpet and damages the fibers, potentially spreading the stain wider. Instead, use a clean, dry cloth to gently press down on the affected area, absorbing as much liquid as possible. Repeat this process with fresh sections of the cloth until no more liquid transfers.
For water-based stains like coffee, juice, or soda, a mixture of water and white vinegar is highly effective. White vinegar acts as a mild acid that helps break down the residue without damaging the dye. Mix equal parts of distilled water and white vinegar in a spray bottle. Lightly mist the stained area but avoid soaking the carpet, as excess moisture can lead to mold growth underneath. After spraying, continue to blot vigorously with a dry towel. The acidity neutralizes odors and lifts the stain particles. For stubborn residues, you can sprinkle baking soda over the damp area after blotting. Allow it to sit until completely dry, then vacuum it up. This absorption technique draws remaining moisture and impurities out of the fabric.
Oil-based stains, such as grease, butter, or wine, require a different approach because water can spread oil rather than removing it. For these spills, sprinkle cornstarch or baking soda immediately upon discovery. These powders act as an absorbent agent for the oils. Let them sit for at least fifteen minutes to bind with the fat molecules, then vacuum them thoroughly. Follow up with a small amount of mild dish soap diluted in water to treat any remaining ring. Use a soft brush to agitate the soapy solution gently, lifting the oil from the fibers. Remember to rinse lightly with a damp cloth afterwards to prevent soap buildup, which attracts more dirt later. Handling spills promptly transforms a potential permanent ruin into a minor blip in your daily routine.
## DIY Recipes for General Dirt Removal
While spot treating fixes accidents, maintaining the overall cleanliness of a carpet requires tackling accumulated dirt and general grime. You can create powerful cleaning agents using pantry staples that work wonders on embedded soil. One of the most versatile ingredients is baking soda. Beyond its use in cooking, baking soda is a mild abrasive and odor neutralizer. To create a powder cleanser, simply spread a generous layer of dry baking soda across the dry carpet. Let it sit for at least an hour, or ideally overnight. During this time, the powder absorbs odors, oils, and loosened dirt. Vacuuming it up afterwards removes the contaminants along with the powder. This method is especially beneficial for refreshing areas that have been untouched for weeks.
For a liquid deep-cleaning solution, mixing warm water with a small amount of mild, fragrance-free dish detergent works exceptionally well. Dish detergents are designed to cut through grease and food residues, making them suitable for general floor maintenance. Add one teaspoon of liquid detergent to one quart of warm water. Avoid using excessive soap, as residue left in the carpet can become sticky and attract dirt faster. Apply this solution using a sponge or mop, working in small sections. Do not saturate the carpet; a damp application is superior to a wet one. Agitate the solution with a soft-bristled brush in a circular motion, moving from the outside of the dirty area toward the center. This prevents the dirt from spreading outward. As you scrub, you will see the foam rise, indicating that dirt is being lifted. Wipe the area with a clean, damp cloth to rinse out the soap.
Enhance your cleaning power by adding essential oils to your mixture. Tea tree oil and lavender oil possess natural antimicrobial properties that help kill bacteria and keep the home environment fresh. Adding ten to twenty drops of essential oil to your bucket of soapy water adds a pleasant aroma without leaving harsh chemical traces. Another effective recipe involves using hydrogen peroxide, though caution is advised here. Hydrogen peroxide is a bleaching agent, so only use it on white or light-colored carpets. Mix half a cup of three percent hydrogen peroxide with a tablespoon of dish soap. Test this on a hidden spot first. Pour the mixture onto a stain or dirty area, let it bubble and activate for ten minutes, then blot dry. These DIY approaches provide a chemical-free, budget-friendly alternative to commercial carpet shampoos, empowering you to manage hygiene without compromising indoor air quality or breaking the bank.
## Effective Drying and Ventilation Strategies
One of the most common mistakes in manual carpet cleaning occurs after the solution has been applied: improper drying. Leaving carpets damp creates a breeding ground for mold, mildew, and unpleasant odors that can linger even after the surface dries. Because hand cleaning uses less water than rented machines, drying is generally faster, but it still requires active management. Passive air drying is insufficient in humid environments. To accelerate the process, you must engineer airflow across the cleaned surfaces. Open windows and doors to create a cross-breeze. Positioning box fans to blow directly over the wet areas increases evaporation rates significantly. Aim for a fan direction that circulates air horizontally across the floor rather than just blowing air down vertically.
If weather conditions are humid or rainy, running a dehumidifier in the room is the most effective strategy to pull moisture from the air and the carpet fibers. Set the unit to run continuously throughout the drying period. Additionally, turning on ceiling fans or portable oscillating fans helps keep air moving. The goal is to reduce ambient humidity quickly. Another practical tip involves elevating furniture off the dried sections once they are sufficiently dry but not bone dry, to allow air to circulate underneath. Use protective pads or plastic sheeting under furniture legs to avoid transferring moisture back onto the carpet. Avoid walking on the carpet while it is damp, as footprints can leave permanent marks or track mud from shoes onto the wet fibers.
Estimating dry time varies based on room temperature, humidity levels, and carpet pile height. Generally, low-pile synthetic carpets may dry within four to six hours, while plush or wool carpets might take twelve hours or more. Before allowing foot traffic to return, perform the "white sock test." Put on a pair of clean white socks and walk over the dried area. If any residue transfers to the sock, the carpet is still too moist. Patience ensures longevity. Rushing the drying process can compromise the integrity of the glue holding the carpet to the padding, leading to peeling or buckling over time. Proper ventilation is not just about convenience; it is a preventative health measure that protects your home from biological hazards associated with moisture retention.
## Conclusion and Ongoing Maintenance Advice
Cleaning your carpet without specialized equipment is a manageable, cost-effective skill that anyone can master. By utilizing the strategies outlined above—prompt response to spills, clever DIY cleaning recipes, and diligent drying practices—you can maintain a fresh, hygienic, and visually appealing home. The initial preparation phase sets the tone for success, ensuring that the right tools are on hand and potential risks like color bleeding are mitigated. Immediate action on stains prevents permanent damage, while homemade solutions using vinegar, baking soda, and mild detergents offer safe alternatives to harsh industrial chemicals. Finally, prioritizing ventilation guarantees that your hard work does not inadvertently create mold issues down the road.
To extend the life of your carpet between major cleaning sessions, incorporate ongoing maintenance into your weekly routine. Frequent vacuuming is the single most effective way to prevent dirt from embedding deep into the fibers. Aim to vacuum high-traffic areas at least twice a week and other areas once a week. Using an empty dust bag or cleaning the bin of your vacuum cleaner regularly maintains suction power, which is crucial for pulling out fine particulate matter. Implement a strict no-shoes policy indoors. Shoes bring pesticides, pollutants, and outdoor grit that wear down carpet fibers rapidly over time. This small change can significantly reduce the frequency of deep cleaning required.
Rotate your furniture occasionally to redistribute foot traffic. Placing a rug mat or runner in entryways and hallways traps the majority of dirt before it reaches the main carpeted zones, reducing wear on the primary flooring. Schedule a deeper manual cleaning or professional extraction every six to twelve months, depending on foot traffic levels. Regular upkeep transforms the daunting task of carpet cleaning into a simple rhythm of home care. With consistency and the right techniques, your carpets will remain vibrant, safe for children and pets, and free of harmful allergens. Embrace the manual approach not only as a money-saving tactic but as a mindful practice of caring for your living environment with intention and care.
By following this comprehensive guide, you equip yourself with the knowledge to handle any mess that comes your way. The journey to a cleaner home starts with the right mindset and the willingness to roll up your sleeves. There is no substitute for the satisfaction of knowing you maintained your property with care and resourcefulness. Enjoy your fresh spaces, breathe easier knowing fewer toxins are in your home, and appreciate the resilience of your carpets under proper stewardship. Keep these tips handy for future reference, and let your flooring continue to serve your home beautifully for years to come.