How to Fix a Leaky Faucet Without Calling a Plumber
DIY Plumbing Solutions for a Leak-Free Home
Introduction to Fixing a Leaky Faucet Yourself
Fixing a leaky faucet is one of the most common household repairs that homeowners can tackle themselves. Not only does doing it yourself save you the cost of hiring a professional plumber, but it also gives you a sense of accomplishment. In this article, we will walk you through the process of identifying the cause of your leaky faucet, gathering the necessary tools, and making the repairs.
Understanding Why DIY Plumbing Can Save Money and Time
Plumbers can be expensive, especially if the issue is minor and could have been fixed with some basic knowledge and tools. By learning how to fix a leaky faucet yourself, you can avoid unnecessary costs and save time waiting for a professional appointment.
Identifying Common Causes of Leaky Faucets
There are several reasons why a faucet might be leaking. The most common causes include worn-out O-rings or washers, loose or damaged parts, or mineral deposits that have built up over time. By understanding these potential issues, you can better diagnose the problem and determine the appropriate solution.
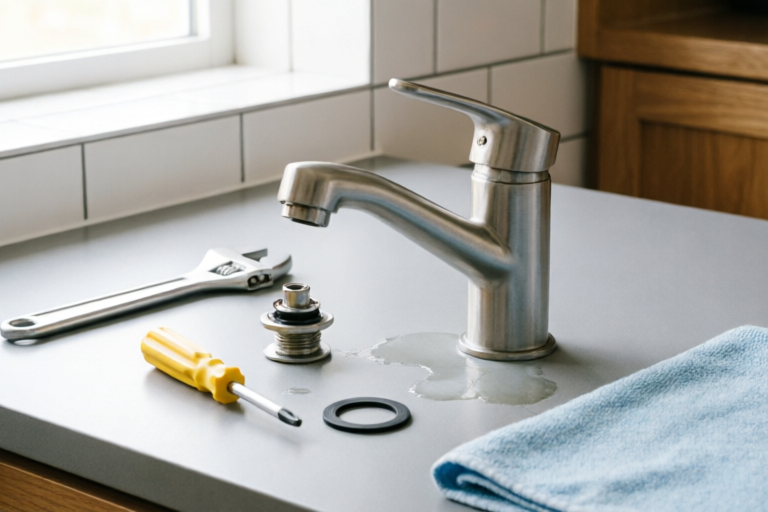
Tools You'll Need for Basic Repairs
- Adjustable wrench: For tightening or loosening nuts and bolts.
- Screwdriver set: To remove the faucet handle and access internal components.
- Replacement parts: Such as new O-rings, washers, and seals.
- Pliers: Useful for gripping small parts during disassembly.
- Teflon tape: To wrap around threads before reassembling the faucet.
Step-by-Step Guide to Diagnosing the Problem
Before you start any repairs, it's important to properly diagnose the issue. This will help ensure that you're addressing the root cause of the leak and not just treating symptoms.
Checking for Visible Leaks and Dripping Water
The first step is to visually inspect the faucet for any obvious signs of leakage. Look for water dripping from the spout or pooling around the base of the faucet. Pay attention to whether the leak occurs when the faucet is turned on or off, as this can provide clues about the location of the problem.
Turning Off Water Supply and Draining Pipes
To safely work on your faucet, you need to turn off the water supply to prevent water from flowing through the pipes while you're making repairs. Locate the shut-off valves under the sink and turn them clockwise to close the water supply. Once the water is turned off, open the faucet to drain any remaining water from the pipes.
Inspecting Faucet Components for Wear or Damage
With the water supply turned off and the pipes drained, you can begin inspecting the internal components of the faucet. Remove the handle using an appropriate screwdriver, then carefully examine the stem assembly, cartridge, and other parts for any signs of wear or damage. Look for cracks, corrosion, or misalignment that could be contributing to the leak.
Replacing Worn Out O-Rings and Washers
One of the most common causes of a leaky faucet is a worn-out O-ring or washer. These rubber seals can deteriorate over time due to exposure to water and mineral deposits, leading to leaks.
Removing the Handle and Stem Assembly
To replace an O-ring or washer, you'll first need to remove the handle and stem assembly. Use a screwdriver to loosen and remove any decorative caps or trim pieces. Then, use an adjustable wrench to loosen the packing nut that holds the stem in place. Carefully pull the stem out of the faucet body.
Identifying and Purchasing the Correct Replacement Parts
Once the stem is removed, you can identify the type of O-ring or washer that needs to be replaced. Take the old part to a hardware store or home improvement center to find an exact match. It's important to choose the right size and material to ensure a proper fit and long-lasting performance.
Properly Installing New O-Rings and Washers
After purchasing the replacement parts, it's time to install them. Apply a small amount of plumber's grease to the new O-ring or washer to help it slide into place more easily. Insert the new part onto the stem or cartridge, ensuring that it is seated correctly. Reassemble the faucet by reversing the removal process, making sure everything is tightened securely.
Fixing Loose or Damaged Faucet Parts
If your faucet is leaking due to loose or damaged parts, there are several steps you can take to address the issue.
Tightening Loose Nuts and Screws Securely
Loose nuts and screws can cause water to seep through gaps in the faucet assembly. Use an adjustable wrench or pliers to tighten any loose connections, ensuring they are secure but not overtightened. Over-tightening can strip threads or damage the faucet.
Repairing or Replacing Damaged Handles
If the handle itself is cracked or worn, it may need to be replaced. Look for a handle that matches the style and finish of your existing faucet. Remove the old handle by unscrewing it from the stem, then install the new one following the manufacturer's instructions.
Ensuring Proper Alignment of All Components
When reassembling the faucet, make sure all components are properly aligned. Misaligned parts can lead to leaks or poor functionality. Check that the cartridge or stem is seated correctly in the faucet body and that the handle is aligned with the valve mechanism.
Testing Your Repairs and Restoring Water Supply
After completing your repairs, it's important to test the faucet to ensure the leak has been fixed and everything is functioning properly.
Slowly Turning On the Water Supply
Gently turn the water supply back on by rotating the shut-off valves counterclockwise. Allow the pipes to fill with water, then check for any leaks at the base of the faucet or around the spout.
Checking for Leaks at Various Points
Inspect the faucet thoroughly for any signs of leakage. Run both hot and cold water to test the entire system. If you notice any drips or leaks, turn off the water supply again and recheck the components for proper installation.
Adjusting Flow and Temperature as Needed
Once the faucet is leak-free, you may want to adjust the flow rate and temperature settings to ensure optimal performance. Check the manufacturer's instructions for specific guidance on adjusting these settings.
Conclusion and Tips for Maintaining Your Faucet
By following the steps outlined in this guide, you should be able to successfully fix a leaky faucet without calling a plumber. Remember that regular maintenance can help extend the life of your faucet and prevent future issues.
Summary of Key Steps for Fixing a Leaky Faucet
- Diagnose the problem by checking for visible leaks and inspecting the internal components.
- Turn off the water supply and drain the pipes before making repairs.
- Replace worn-out O-rings or washers as needed.
- Tighten loose nuts and screws, and repair or replace damaged parts.
- Test the repairs by turning on the water supply and checking for leaks.
Preventative Maintenance Tips to Avoid Future Issues
- Regularly clean the faucet to prevent mineral buildup.
- Check for leaks periodically and address any issues promptly.
- Use a basin wrench to reach difficult-to-access areas when tightening nuts.
When It's Best to Call a Professional Plumber
While many faucet issues can be resolved with DIY repairs, there are times when it's best to call a professional plumber. If you're unsure about the cause of the leak or if the problem persists after making repairs, it's wise to seek expert assistance. Additionally, if the faucet requires extensive repairs or replacement, a professional can ensure the job is done correctly and efficiently.
Comments

For step 2, a good flashlight really helps when inspecting those tight spaces.

Great tutorial. Is there a way to fix a leaky faucet without turning off the water supply?

Super helpful! I used this to fix my kitchen and bathroom faucets. Saved me a lot of time too.

Is WD-40 useful for loosening rusted screws? Just curious.

Tightening the loose nuts really did the trick. No more drips!
I'm stuck on step 3. How do I know which O-ring size to buy?

Worked like a charm! Saved me $100 on plumber fees. Thanks for the detailed guide!