How to Fix a Leaky Faucet in 5 Easy Steps
DIY Plumbing Made Easy
Introduction to Fixing a Leaky Faucet
A leaking faucet is not only annoying but can also lead to significant water wastage and increased utility bills. Addressing the issue promptly is essential for both your wallet and the environment. Before diving into the repair process, it's important to gather the necessary tools and understand the basic steps involved.
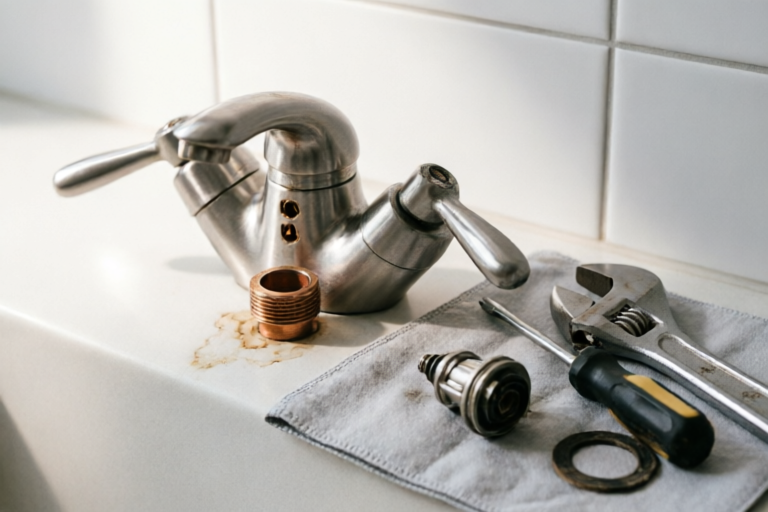
Tools Needed
- Adjustable wrench
- Phillips and flathead screwdrivers
- Teflon tape
- New washers and O-rings (if needed)
- Plumber’s putty
This guide will walk you through five straightforward steps to fix a leaky faucet. Follow along and get ready to save some cash while learning a valuable DIY skill.
Step 1: Identifying the Type of Faucet
The first step in repairing a leaky faucet is to identify its type. There are several common types of faucets, including compression, cartridge, ball, and ceramic-disk faucets. Each type requires slightly different repair techniques.
Differentiating Between Types
- Compression Faucet: Uses a stem and washer system. Common in older homes.
- Cartridge Faucet: Has a single cartridge that controls water flow. Often found in newer homes.
- Ball Faucet: Contains a rotating ball with holes that control water flow. Known for their durability.
- Ceramic-Disk Faucet: Features ceramic disks that control water flow. Very efficient and long-lasting.
Knowing the type of faucet you're dealing with is crucial because the repair methods differ significantly. Once you've identified your faucet type, you can proceed with the next step.
Step 2: Shutting Off Water Supply and Preparing the Area
Before you start disassembling the faucet, make sure to shut off the water supply. This prevents water from flowing through the pipes while you work, making the repair process safer and cleaner.
Locating and Turning Off Water Supply Valves
Water supply valves are typically located under the sink. Look for two separate valves, one for hot water and one for cold water. Turn them clockwise to shut off the water supply.
Clearing the Area
Remove any items around the sink that could obstruct your workspace. This includes dishes, sponges, and other objects. Having clear access to the faucet will make the repair process smoother.
Draining Remaining Water
Once the water supply is turned off, open the faucet to drain any remaining water from the pipes. This ensures that no water will leak out during the repair process.
Step 3: Disassembling the Faucet
With the water supply shut off and the area prepared, it's time to start disassembling the faucet. The exact steps may vary depending on the type of faucet, but the general procedure is similar.
Removing Handles and Decorative Caps
Start by removing the handle and any decorative caps. These are usually held in place by screws, which can be removed using a screwdriver. Once the screws are out, gently pull off the handle and caps.
Loosening and Removing Screws
Next, locate the screws that hold the faucet body together. Use an adjustable wrench or screwdriver to loosen and remove these screws. Be careful not to strip the screws, as this can complicate the repair process.
Carefully Taking Apart the Faucet Mechanism
After removing the screws, carefully separate the faucet body. Depending on the type of faucet, there may be additional parts such as cartridges, washers, or O-rings. Take note of the order in which you remove each part, as this will help when reassembling the faucet later.
Step 4: Replacing Faulty Parts
Once the faucet is disassembled, inspect the internal components for any signs of wear or damage. Common issues include worn-out washers, damaged O-rings, or corroded parts.
Identifying Worn-Out Components
Use a flashlight to examine the internal parts closely. Look for any signs of corrosion, cracks, or misalignment. If you find any damaged parts, they will need to be replaced.
Purchasing Replacement Parts
Take the damaged parts to a local hardware store to purchase replacements. Make sure to bring the old parts with you so that you can match them accurately. Alternatively, you can search online for compatible parts based on your faucet model.
Installing New Parts Correctly
Once you have the new parts, carefully install them in the faucet. Ensure that all parts are properly aligned and sealed. Apply Teflon tape to threaded connections to create a watertight seal. Tighten the screws securely but avoid over-tightening, as this can cause damage.
Step 5: Reassembly and Testing
With the faulty parts replaced, it's time to reassemble the faucet. Follow the same steps in reverse to put everything back together. Start by attaching the internal components and then replace the handle and decorative caps.
Turning On Water Supply Slowly
Once the faucet is reassembled, slowly turn on the water supply valves. Check for any leaks around the base of the faucet. If there are no leaks, proceed to the final step.
Final Adjustments
If the faucet still leaks after reassembly, double-check the installation of the new parts. Ensure that all screws are tight and that the Teflon tape is properly applied. You may need to make slight adjustments to the faucet handles to achieve smooth operation.
Conclusion and Tips for Maintaining Your Faucet
Fixing a leaky faucet is a simple yet rewarding task that can save you money and reduce water waste. By following these five easy steps, you can successfully repair most common faucet issues.
Additional Tips for Preventing Future Leaks
- Regularly check for leaks and address them promptly.
- Apply plumber’s putty to the base of the faucet to prevent drips.
- Ensure that all connections are tightly secured.
Encourage yourself to take on more plumbing challenges. With practice, you'll become more confident in tackling various plumbing issues around your home.
Comments

Does this work for outdoor faucets too? Or are there extra steps involved?

Finally fixed that annoying drip. Super relieved!

I used a wrench instead of a screwdriver for the first step and it saved me some time. Might want to mention that.

Solid advice. Just wanted to add that for ceramic-disk faucets, you might need a special tool to remove the handle.
This was super helpful. I had to replace the O-ring and now my kitchen faucet is as good as new.

Great guide! Quick question though, what if you don't have a shut-off valve? Can you still fix the leak?

Worked like a charm! Took me longer than 5 minutes but I'm no plumber. Thanks for the step-by-step!