How to Clean Your Keyboard Without Damaging It
Clean Your Keyboard Safely and Effectively
Introduction to Keyboard Cleaning
Importance of Keeping Your Keyboard Clean: A clean keyboard is not just about aesthetics; it's crucial for maintaining optimal performance and preventing health issues. Dust, crumbs, and bacteria can accumulate over time, leading to sluggish keys, malfunctioning inputs, and even potential health risks.
Common Issues Caused by a Dirty Keyboard: A dirty keyboard can lead to various problems such as sticky keys, inaccurate typing, and even hardware malfunctions. Additionally, it poses a risk of spreading germs and bacteria, which can affect your health.
Overview of the Cleaning Process: Cleaning your keyboard involves removing surface debris, wiping down the exterior, and thoroughly cleaning keycaps. This article will guide you through each step to ensure your keyboard remains in top condition without causing any damage.
Preparation for Cleaning
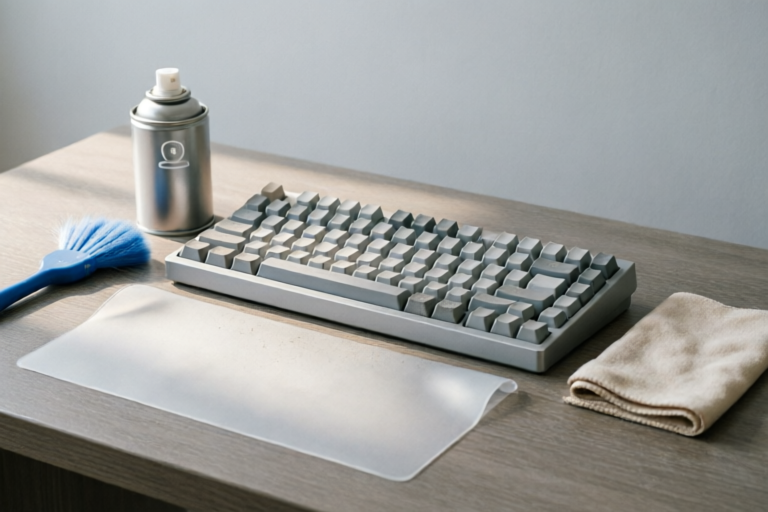
Tools and Materials Needed: To effectively clean your keyboard, gather the following items:
- Compressed air canister
- Cotton swabs
- Rubbing alcohol (isopropyl alcohol)
- Slightly damp microfiber cloth
- Keycap puller (optional)
Precautions to Take Before Starting the Cleaning Process: Before you begin, make sure your keyboard is disconnected from the computer to avoid any accidental input during cleaning. Additionally, ensure that the area where you are cleaning is well-lit and spacious.
Disconnecting the Keyboard from the Computer: If your keyboard is connected via USB or wirelessly, disconnect it from the computer to prevent any accidental key presses during the cleaning process.
Basic Cleaning Techniques
Removing Surface Debris with Compressed Air: Use a can of compressed air to blow away dust, crumbs, and other loose debris from between the keys. Hold the can upright and direct the airflow at an angle to avoid forcing debris deeper into the keyboard.
Wiping the Exterior with a Slightly Damp Cloth: Gently wipe the exterior of the keyboard with a slightly damp microfiber cloth. Ensure the cloth is only lightly moistened to avoid any water seeping into the keyboard's interior.
Avoiding Water and Other Harsh Chemicals: Never use water directly on the keyboard, and avoid using harsh chemicals like bleach or ammonia. These can damage the keyboard's components and cause permanent harm.
Detailed Cleaning of Keycaps and Spaces
Loosening Keycaps Gently for Thorough Cleaning: For a more thorough cleaning, you may need to remove the keycaps. Use a keycap puller or gently pry them off with a flathead screwdriver. Be cautious not to apply too much force, as this could damage the keycaps or the switch underneath.
Using Cotton Swabs Dipped in Rubbing Alcohol for Stubborn Dirt: Once the keycaps are removed, use cotton swabs dipped in rubbing alcohol to clean the undersides and spaces between the keycaps. The alcohol will help dissolve grease and grime while disinfecting the area.
Reassembling Keycaps Securely After Cleaning: After cleaning, allow the keycaps and the areas they were attached to dry completely before reattaching them. Make sure they are seated properly to ensure smooth operation.
Special Considerations for Different Types of Keyboards
Cleaning Membrane Keyboards vs. Mechanical Keyboards: Membrane keyboards have a thin layer of rubber beneath the keys, making them less susceptible to liquid damage but more prone to dust accumulation. Mechanical keyboards, on the other hand, have individual switches under each keycap, requiring more careful handling during cleaning.
Handling Laptops and Wireless Keyboards Specifically: Cleaning laptop keyboards requires extra caution due to their smaller size and proximity to the screen. For wireless keyboards, ensure they are fully charged or disconnected from power sources before cleaning.
Tips for Gaming Keyboards with RGB Lighting: Gaming keyboards often feature RGB lighting and complex designs, so be especially gentle when removing and reattaching keycaps. Avoid exposing the RGB circuitry to moisture or excessive cleaning solutions.
Maintenance and Preventive Measures
Regular Cleaning Schedule Recommendations: To maintain your keyboard's performance, it's recommended to clean it every 1-2 months. More frequent cleaning may be necessary if you use your keyboard in dusty environments or if you notice performance issues.
Best Practices to Prevent Future Buildup of Dirt and Debris: To minimize dirt and debris, consider using a keyboard cover when not in use. Additionally, try to avoid eating or drinking near your keyboard to prevent spills and crumbs.
Summary of Key Points for Successful Keyboard Maintenance: Regular cleaning, proper tool usage, and preventive measures are essential for keeping your keyboard in excellent condition. By following these guidelines, you can extend the life of your keyboard and ensure it functions smoothly.
Conclusion and Final Thoughts
Recap of the Importance of Regular Keyboard Cleaning: Regular cleaning helps prevent performance issues, extends the lifespan of your keyboard, and keeps it hygienic. A clean keyboard ensures accurate typing and prevents potential health risks.
Encouragement to Adopt a Consistent Cleaning Routine: Incorporate regular cleaning into your routine to maintain your keyboard's performance and longevity. A few minutes of cleaning every month can save you from costly repairs and downtime.
Additional Resources for Further Reading on Keyboard Care: For more detailed information, check out our blog posts on keyboard maintenance and troubleshooting common issues. Stay informed and keep your keyboard in top shape!
Comments

After trying this method, my keyboard feels brand new. I've added it to my weekly cleaning routine now.

Super helpful! I was worried about damaging my laptop keyboard but it turned out fine. Just took extra care around the edges.

This was super helpful for my RGB mechanical keyboard. Just wondering if there's a way to avoid removing the keycaps when cleaning around the LED lights?

I tried this last night. Took longer than expected but definitely worth it. No more crumbs under the keys!
Worked for me! Just wanted to say that using a soft-bristled brush instead of cotton swabs helped get into those tight spaces better.

Quick question - do I really need to disconnect my keyboard before cleaning? My keyboard is USB, could that cause any issues?

Man, I never thought cleaning my keyboard would be so easy! Used the rubbing alcohol trick on some sticky keys and they're like new again. Thanks!