# How to Deep Clean Your Refrigerator Inside and Out
## Introduction
Your refrigerator is the workhorse of your kitchen. It preserves your groceries, keeps your food fresh, and ensures that your family eats safely. Yet, amidst the daily hustle of meal prep and grocery shopping, it often slips through the cracks when it comes to hygiene and maintenance. A dirty refrigerator does more than just look unappealing; it harbors bacteria, spreads unpleasant odors, and can even reduce the appliance’s energy efficiency. Over time, spills, crumbs, and condensation accumulate in corners and crevices that are difficult to reach, creating an environment where mold and pathogens thrive.
This comprehensive guide is designed to walk you through the entire process of deep cleaning your refrigerator, both inside and out. We will cover everything from preparation and safety measures to the final restocking phase. By following these detailed steps, you will not only restore your fridge to pristine condition but also establish habits that prevent future messes. Whether you are dealing with persistent vinegar smells, sticky residue on shelves, or grimy rubber seals, this article provides practical solutions tailored to various refrigeration needs. Let’s transform your cold storage unit into a model of sanitation and organization.
### Why Regular Cleaning Matters
Before diving into the mechanics of cleaning, it is crucial to understand the frequency and necessity of this task. Many homeowners wonder, “How often should I clean my fridge?” While a quick wipe-down after a spill is necessary immediately, a deep clean should happen every three to four months. This interval allows for a thorough breakdown of grime before it becomes entrenched. Beyond aesthetics, a deep clean promotes food safety. Bacteria like Salmonella and E. coli can spread via cross-contamination from rotting food to clean items on different shelves. Furthermore, dust buildup on the exterior coils can cause the motor to work harder, leading to higher electricity bills and potential mechanical failure. Taking care of your refrigerator is an investment in health and household economics.
### Health Implications of a Dirty Fridge
A neglected refrigerator is a breeding ground for mold and mildew. Spills containing dairy products or meats that go unnoticed can develop a slimy texture, signaling bacterial growth. When this slime is disturbed, it releases volatile organic compounds that contribute to bad odors and potential allergic reactions in sensitive individuals. Additionally, sticky residues attract pests like cockroaches and ants, which carry diseases themselves. By committing to a rigorous cleaning regimen, you mitigate these health risks, ensuring that the food you serve is free from environmental contaminants.
---
## 1. Preparation and Safety Measures
The success of a deep cleaning session relies heavily on preparation. Rushing into the process without a plan can lead to spoiled food, wasted time, or even injury. Proper planning ensures that the job is completed efficiently and safely.
### Gathering Necessary Supplies
You do not need expensive industrial-grade cleaners to clean your refrigerator effectively. In fact, harsh chemicals can leave behind toxic fumes or residues that contaminate your food. Instead, focus on gathering mild, effective, and non-toxic supplies:
* **Microfiber Cloths:** These are superior to paper towels because they trap dust and dirt rather than pushing it around. They are also lint-free, which is essential for stainless steel surfaces.
* **Mild Detergent:** A gentle dish soap mixed with warm water is perfect for general cleaning. Avoid bleach unless specifically treating mold, as bleach fumes can be harmful when enclosed in a small space.
* **White Vinegar:** An excellent natural disinfectant and deodorizer. Its acidic nature cuts through grease and neutralizes alkaline odors.
* **Baking Soda:** Ideal for absorbing odors and creating a gentle abrasive paste for stubborn stains.
* **Warm Water:** Essential for dissolving grime and activating cleaning agents.
* **Soft-Bristled Brush:** Useful for cleaning the rubber gaskets and door seals where crumbs hide.
* **Thermometer:** To monitor the temperature of your cooler bags during the emptying phase.
### Electrical Safety and Unplugging
One of the most important safety steps is unplugging the unit. Although modern refrigerators have insulated cords, there is always a risk of electrical shock if you accidentally splash water onto the light socket or control panel. Unplugging the unit also turns off the compressor, preventing it from cycling on while you are moving heavy glass shelves around. If the refrigerator cannot be moved easily, ensure the cord is secured so it does not trip anyone. If you live in an area with poor wiring, consider turning off the circuit breaker dedicated to the kitchen appliances for added peace of mind.
### Storing Perishables Safely
Once unplugged, the fridge begins to lose its cool. You need to store perishable food outside the unit for the duration of the cleaning. Coolers with ice packs are the best option. If you lack space, plan the cleaning during colder weather or divide the work into two halves (half the fridge today, half tomorrow) using smaller containers. Ensure that meat and seafood are sealed in waterproof bags to prevent cross-contamination in your cooler with other foods like fruits or vegetables. Maintain the temperature below 40°F (4°C) by replacing ice as needed. This precaution prevents foodborne illness during the restoration period.
---
## 2. Emptying the Fridge and Removing Accessories
With your supplies ready and food stored, it is time to clear out the refrigerator. This stage requires patience and categorization to ensure nothing gets forgotten or misplaced.
### Removing All Food Items
Start by pulling out everything. Place items on a counter or a large table where you can sort them quickly. Do not simply pile them in the sink or floor; this increases the risk of contamination. As you remove each item, check the expiration dates immediately. Discard any old condiments, wilted vegetables, or expired dairy products before you even start wiping. This reduces the volume of items you have to handle and helps identify if there was food spoilage causing odors previously.
### Handling Adjustable Shelves and Crisper Drawers
Most modern refrigerators come with removable shelves and crisper drawers. Take these out carefully. Glass shelves can be surprisingly heavy and slippery, especially when wet. Always lift them straight up and over to avoid snagging them on the rails or side walls. Some shelves may pop out forward, while others slide backward; refer to your user manual if you encounter resistance. Once removed, inspect them for cracks or chips. Damaged glass poses a risk of shattering later under weight stress.
### Separated Washing Protocol
Not all accessories can be washed in the same way. Plastic drawers are generally dishwasher-safe, but you should verify this. High heat can warp plastic over time. If hand-washing, soak them in warm soapy water to loosen dried-on grime. Removable shelves made of tempered glass should be washed separately in a sink lined with a towel to prevent breakage. Never stack glass shelves together during washing as friction can cause scratches. Rinse thoroughly and allow them to dry completely before placing them back. Wet shelves can encourage mold growth in corners upon reinsertion.
---
## 3. Deep Cleaning Interior Surfaces and Shelving
Now that the compartments are empty, you can attack the interior surfaces themselves. This is the core of the deep clean where you eliminate lingering grime and biological hazards.
### Wiping Down Internal Walls and Ceiling
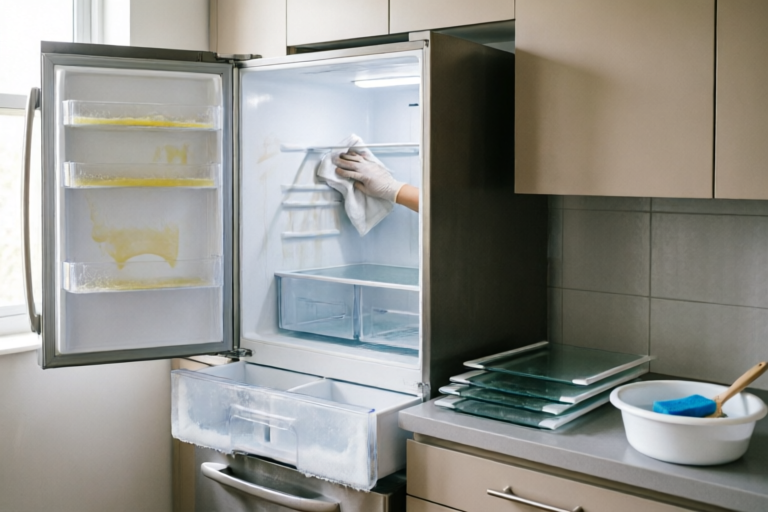
Using a microfiber cloth dipped in your cleaning solution (warm water and mild soap), begin cleaning from the top down. Gravity dictates that dirt drips downward; cleaning bottom-up would simply move grime from the walls to the floor. Pay special attention to the ceiling of the fridge, where steam from hot food condenses and leaves a film. Wipe the walls methodically, section by section. For stubborn spots, such as splattered sauces or spilled milk that has baked onto the wall, apply a paste of baking soda and water. Let it sit for five minutes to break down the bond before scrubbing gently. This avoids scratching the smooth plastic lining.
### Tackling Persistent Odors and Mold
If your fridge smells, it is usually due to a mix of decomposition and moisture. Vinegar is the gold standard for odor removal. Fill a spray bottle with undiluted white vinegar and mist the interior lightly. Alternatively, place a bowl of vinegar inside the closed unit for several hours after cleaning to absorb remaining smells. For black mold spots found in corners, use a mixture of warm water and rubbing alcohol (isopropyl alcohol). Alcohol kills bacteria and evaporates quickly, reducing moisture retention. Scrub these areas with a soft brush to dislodge the roots of the mold. If the smell persists after cleaning, replace the drip pan located underneath the fridge if accessible, as clogged drainage pans often harbor stagnant water and algae.
### Cleaning Removable Parts Thoroughly
Return to the shelves and drawers you set aside. If you soaked them, rinse them off with clean water. Inspect the undersides of shelves for accumulated debris caught in the grooves. Use your soft-bristled brush to dislodge hidden crumbs. Dry every component with a fresh, dry microfiber cloth. Moisture is the enemy of cleanliness in cold environments; leftover water droplets can freeze and form ice patches or become breeding grounds for bacteria. Once dry, organize the shelves according to your intended layout before putting them back, or store them flat in the cabinet if you are doing a massive overhaul.
---
## 4. Polishing the Exterior and Sealing Edges
Often, the interior of the refrigerator is clean, but the exterior reveals a history of fingerprints, grease splashes, and dust accumulation. Maintaining the outside is just as important for hygiene and appliance longevity.
### Clean the Outer Door Surface
The cleaning method depends on your finish. For standard white enamel or painted surfaces, a mild detergent solution works well. Dry with a soft cloth to prevent water spots. For stainless steel doors, this requires specific care. Stainless steel is prone to showing streaks and fingerprints. Use a cleaner specifically designed for stainless steel or a mixture of olive oil and water to polish. Always wipe in the direction of the grain to avoid circular streaks. Never use steel wool or abrasive sponges, as they will permanently scratch the surface finish. If there are tough sticky residues like candy labels, use a bit of cooking oil to dissolve the adhesive, then wipe clean.
### Focus on Handles and KNOBS
Door handles are the germiest part of your home. Multiple hands touch them daily, transferring oils, bacteria, and germs. Remove them if possible for soaking; otherwise, spray sanitizer directly onto a cloth and scrub the handle vigorously. Don’t forget the push-latch mechanisms at the top or bottom of the door. These often collect grime because they are recessed. A cotton swab dipped in cleaning solution can reach these tiny gaps. Disinfecting handles regularly is a low-cost way to reduce the overall bacterial load in the kitchen.
### Checking Rubber Gaskets and Seals
The rubber gaskets (door seals) are critical for energy efficiency. If they are dirty, sticky, or cracked, warm air enters the fridge, making the compressor work overtime and raising energy costs. Pull the gasket back gently to expose the inner surface. Check for food particles trapped in the folds. Scrub them with your toothbrush or soft brush and soapy water. Inspect for signs of cracking, brittleness, or tearing. If the gasket tears, the seal is compromised, and the food will not stay cold properly. Perform the “dollar bill test”: close the door on a dollar bill. If it slides out easily without resistance, the magnet is weak, and the seal needs replacement. A tight seal ensures your fridge operates quietly and efficiently.
---
## 5. Restocking and Establishing Maintenance Habits
Cleaning is only half the battle; keeping it clean is the real challenge. Reintroducing food to a freshly sanitized environment should be done strategically to maintain order and hygiene.
### Organizing Food Neatly Upon Return
As you put food back, group similar items together. Meat goes on lower shelves to prevent juices from dripping onto ready-to-eat foods below. Produce belongs in the crispers, which are designed to regulate humidity. Dairy and leftovers go on the main shelves where the temperature is most stable. Do not overpack the refrigerator; air circulation is vital for consistent cooling. Leave space between jars and containers. Use lazy susans or clear bins to organize items like condiments or canned goods. This makes it easier to see what you have, reducing waste from forgotten items.
### Labeling Leftovers Properly
Use masking tape and a marker to date all leftovers before storing them. The general rule is to consume leftovers within three to four days. If you are unsure about the age of a container, the label system will catch it before it spoils. Clear containers are highly recommended over opaque ones, as you can visually verify the contents and the condition of the food without opening the package. Labeling reduces decision fatigue and helps maintain a logical inventory system.
### Setting a Recurring Schedule
To prevent the mess from accumulating again, establish a recurring schedule. Mark a date on your digital calendar or set a reminder on your phone for the next deep clean three months from now. Integrate quick weekly checks into your routine: wipe up spills immediately and throw away expired cans during your Saturday grocery run. Small efforts prevent the need for massive cleanups later. Educate your household members on the “one-in, one-out” policy or the importance of wiping up spills. When everyone takes ownership, the fridge stays fresh with less effort required from a single person.
### Maintenance Tools and Longevity
Consider investing in magnetic timers or clipboards to stick inside the fridge that list cleaning tasks. Periodically check the water filter (if equipped) and replace it every six months to ensure water quality and flow rate. A clogged filter can strain the dispenser motor. Finally, vacuum the condenser coils at the back or bottom of the unit once a year. Dust buildup here blocks airflow and causes overheating. These proactive measures extend the lifespan of your appliance, delaying costly replacements.
## Conclusion
Deep cleaning your refrigerator is more than a chore; it is an act of care for your health and your wallet. By following the structured steps outlined above—from preparation and safety to the intricate details of gasket maintenance—you ensure that your kitchen remains a hub of freshness and safety. The time invested in a thorough quarterly clean pays dividends in better-tasting food, lower energy bills, and a more hygienic home environment. Remember, consistency is key. By establishing good habits now, you guarantee that your refrigerator continues to serve you reliably for years to come. Start with the checklist today, and enjoy the peace of mind that comes with a perfectly clean cold storage system.