Tips & Tricks
How to Clean Phone Screen Effectively at Home Today
Clear Vision Starts Here
**Introduction: The Hidden Hygiene Crisis in Your Pocket**
In our hyper-connected world, your smartphone is arguably the most personal device you own, followed closely by your car keys and wallet. However, we rarely subject our phones to the same level of cleaning we give our hands. Studies have shown that cell phones can harbor thousands of bacteria per square inch, more than a kitchen sponge. Beyond health concerns, a smudged, greasy, or dusty screen significantly impacts usability, causing eye strain and frustrating touch responsiveness issues. Many users inadvertently damage their devices through aggressive cleaning attempts, stripping away essential protective layers. This comprehensive guide provides a meticulous, step-by-step protocol to clean your phone screen effectively at home today. We will explore the science of screen protection, identify the correct tools for the job, and establish a maintenance routine that keeps your display pristine without compromising longevity.
By following this methodical approach, you ensure that the investment you have made in your technology remains secure. Whether you own the latest flagship model with ceramic shield glass or a budget device with plastic shielding, the principles of safe cleaning remain consistent. We move beyond the myths of paper towels and window sprayers to establish best practices grounded in materials science. Let us begin transforming your device from a germ-ridden attractant into a sanitized, crystal-clear portal to the digital world.
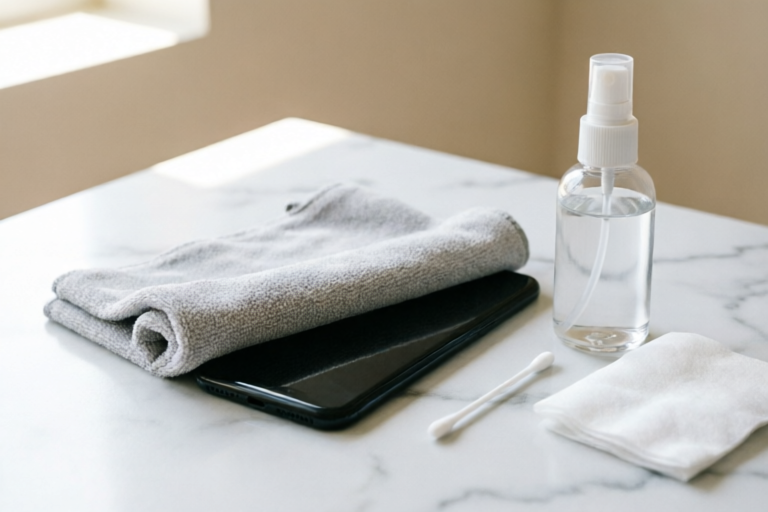
## 1. Gather Safe Cleaning Tools: Essential Supplies for the Job
The foundation of effective screen cleaning lies entirely in preparation. You cannot simply grab any cloth from your drawer; the wrong material acts like sandpaper over time. A detailed inventory of necessary supplies is required to execute this task safely.
### The Microfiber Cloth Advantage
Not all microfiber cloths are created equal. The key factor here is GSM (grams per square meter). For screen cleaning, you require a high-quality microfiber cloth with a fine weave, typically rated between 200 and 300 GSM. Cheaper cloths often feature larger fibers that can trap dirt particles which then scratch the glass upon pressure.
High-grade cleaning cloths are designed with split-fiber technology. When wet, these fibers expand to lift oil and grease rather than pushing them around. Look for cloths marketed specifically for optics, cameras, or eyewear, as they have undergone stricter testing for abrasion resistance. Never substitute this with a cotton T-shirt, coffee rag, or paper towel, as the wood pulp in paper towels can leave residue and cause micro-scratches.
### Choosing the Right Liquid Solution
This is where most homeowners make critical errors. Modern smartphones utilize an oleophobic coating on their glass surfaces. This hydrophobic layer repels oils and fingerprints. Harsh chemicals dissolve this coating rapidly, leaving the screen permanently sticky and prone to collecting more grime.
**What to Avoid Absolutely:**
* **Ammonia:** Found in major glass brands like Windex. Ammonia aggressively eats away at oleophobic coatings and can damage anti-glare treatments.
* **Bleach:** Chlorine is corrosive and can degrade the sealants holding the screen components together.
* **Hydrogen Peroxide:** While a disinfectant, it is often too strong for daily cosmetic cleaning and may discolor plastics surrounding the screen.
* **Rubbing Alcohol (High Concentration):** Isopropyl alcohol above 70% concentration can be risky for older devices and certain screen finishes. While Apple permits occasional use of 70% isopropyl alcohol wipes, daily use accelerates coating degradation.
**What to Use Instead:**
* **Distilled Water:** Pure H2O is often sufficient for daily fingerprint removal. Tap water contains minerals that can leave white streaks once evaporated.
* **Commercial Screen Sprays:** Brands like InvisibleShield or Whoosh sell sprays specifically formulated for touchscreen electronics. These contain mild surfactants that clean oil without attacking the coating.
* **DIY Solution:** Mix a 50/50 ratio of distilled water and a drop of mild dish soap if heavy grease is present. Ensure no soap remains after rinsing.
## 2. Pre-Cleaning Device Preparation: Safety First
Before introducing any moisture or friction to the device, you must prepare the environment and the hardware itself. This phase mitigates risk and ensures access to the areas most likely to harbor dirt.
### Power Down Completely
While it is tempting to clean while scrolling notifications, powering off the device is non-negotiable for a deep clean. A powered-off screen displays black or dark grey, making dust and fingerprints far more visible against the background. Furthermore, turning off the touch interface prevents accidental inputs, such as locking apps open or dialing emergency contacts, while liquids are being applied. Safety-wise, if any liquid were to breach the bezel, a powered-down state reduces the risk of electrical short-circuiting compared to a live circuit.
### Remove Protective Cases
Many protective cases create a "lip" or frame around the screen edge. Debris often gets trapped in this crevice between the case and the glass. By removing the case, you expose the entire perimeter of the screen, allowing for a complete cleaning cycle.
Additionally, the case itself requires cleaning. Silicone and plastic cases accumulate sweat, food residue, and environmental grime behind where they meet the phone. Clean the case separately with warm soapy water, dry it thoroughly, and wait until the phone is bone-dry before reattaching. Moisture trapped between the case and the phone chassis can lead to condensation buildup, damaging ports over time.
### Inspect for Physical Damage
Take a moment to examine your screen for existing hairline cracks or chips. Cleaning an already damaged screen requires extra caution. Liquid wicking into a crack can damage internal components like the digitizer or battery. If a crack is present, dampen the cloth less aggressively and avoid spraying directly near the fracture lines.
## 3. Remove Surface Dust First: The Dry Approach
Never apply liquid immediately. If your screen is covered in loose dust, sand, or debris, adding moisture creates a muddy paste. Rubbing this paste across the glass turns microscopic silica particles into grinding wheels that scratch the surface irreparably. This step addresses the physics of particulate matter.
### The Static Electricity Factor
Screens hold a static charge that attracts floating dust. To neutralize this, use the dry side of your clean microfiber cloth. Gently wipe the screen in broad strokes. Do not press hard; allow the fabric to catch the particles. If the cloth becomes saturated with dust quickly, flip it to the clean side immediately.
### Blowing Techniques
For stubborn particles lodged in the speaker grills or camera lenses, do not blow with your mouth, as saliva droplets are highly corrosive and introduce bacteria. Instead, use a can of compressed air held vertically. Keep the can upright to prevent propellant discharge. Aim the nozzle briefly at the edges of the screen to dislodge dust from the bezel gaps before wiping.
### Checking Your Work
Turn the screen on briefly (if needed) to a bright white image to inspect for remaining dust motes. Turn it off again. Any visible particle means you must repeat the dry wipe process before moving to the damp stage.
## 4. Wipe Using the Proper Technique: Precision Application
Now that the surface is free of abrasive solids, it is time to address the organic oils and persistent stains. The mechanics of how you move the cloth determine the cleanliness of the result.
### Dampening Guidelines
Always apply cleaner to the cloth, never directly onto the screen. Spraying liquid directly risks the mist entering charging ports, headphone jacks, or microphone openings. Hold the phone securely in one hand and gently mist the center of the microfiber cloth until it is barely damp—almost dry to the touch. Squeezing out excess liquid is crucial; the cloth should feel cool, not wet.
### Motion Patterns
Adopt a systematic wiping pattern to avoid missing spots.
1. **Linear Strokes:** Begin with gentle horizontal and vertical linear motions. Cover the top half, then the bottom half. Do not scrub in circles immediately, as this tends to spread oil around before lifting it.
2. **Circular Buffing:** Once the majority of the smudge is gone, switch to small, tight circular motions. This applies even pressure and helps lift the film of oil from the oleophobic coating.
3. **Pressure Control:** Rest the flat palm of your hand on the screen lightly. Never dig your fingernails into the corners. Excessive pressure can stress the glass or damage the underlying adhesive.
4. **Edge Attention:** Pay special attention to the chamfered edges where fingers naturally rest. These areas collect the most skin cells and sweat. Ensure you wrap the cloth around the curvature slightly to clean the very edge of the glass.
### Handling Buttons and Ports
Do not wipe aggressively over physical buttons like the power button or volume rockers, as excessive moisture can seep under the caps over time. Wipe around them carefully. For USB-C or Lightning ports, use a wooden pick or a plastic toothpick to gently loosen compacted lint before wiping the surrounding area with a dry tip of the cloth.
## 5. Final Inspection and Maintenance Tips: Long-Term Clarity
The cleaning process is not complete until you verify the finish and establish a future routine.
### Air Drying Verification
Let the device sit for two minutes undisturbed. This allows any residual moisture in the micro-pores of the casing to evaporate completely. If you put the phone back in your pocket immediately after cleaning while it is still slightly tacky, you defeat the purpose. Inspect the screen from multiple angles under good lighting to check for streaks. If streaks appear, buff them out with a dry portion of the microfiber cloth.
### Establishing a Cleaning Schedule
Consistency beats intensity. Cleaning your phone heavily once a week is better than aggressively scrubbing it once a month. Ideally, perform a light dry wipe daily. This removes oils before they harden. Perform a deep damp clean weekly, or whenever you notice significant build-up.
### Storage Habits
Protect your clean screen by managing where you store the phone. Never place it face down on rough surfaces like concrete tables or denim jeans, as pockets and purses often contain hidden grit (coins, zippers, crumbs) that scratches the glass instantly. When not in use, keep it in its dedicated case on a clean table surface.
### Addressing Common Myths and FAQs
**Q: Can I use Hand Sanitizer?**
A: Only if it is alcohol-based and used sparingly. However, sanitizers contain moisturizers (like glycerin or aloe) that leave a thick, sticky residue difficult to remove from smooth glass. Dedicated screen sprays are superior.
**Q: What about Ultrasonic Cleaners?**
A: Generally, do not submerge your phone in an ultrasonic jewelry cleaner. While effective for metal parts, the frequency vibrations can loosen adhesives holding the screen to the frame, leading to premature delamination.
**Q: How do I remove stuck-on tape residue?**
A: Do not scrape with metal. Apply a small amount of olive oil or baby oil to the sticky spot, wait five minutes to soften the adhesive, and gently roll a rubber eraser over it to pick up the gunk, then wipe clean with microfiber.
**Conclusion: A Commitment to Digital Hygiene**
Maintaining a pristine smartphone screen is more than an aesthetic preference; it is a component of device longevity and digital health. By adhering to the protocols outlined above—utilizing high-GSM microfiber, avoiding harsh solvents, and respecting the delicate oleophobic layers—you extend the life of your hardware. Regular cleaning reduces bacterial load, improves visual clarity for reduced eye strain, and preserves resale value. Treat your phone with the care it deserves, and it will serve you reliably for years to come. Start implementing these habits today, and enjoy the satisfaction of a perfectly clear, sanitized connection to the world.
Comments

green_thumb_99
Has anyone tried the dish soap + water trick? Heard it cuts oil better than chemicals.
👍 13👎 0

streaky_steve
Works okay but my screen gets foggy if I press too hard. Lesson learned on gentle motions!
👍 5👎 0

lazy_dave
I just use my microfiber eyeglass cloth since I already had one. Saved myself a trip to the store lol.
👍 0👎 0
john_skeptic
Can someone confirm if apple cider vinegar mix is safe for OLED screens? Don't wanna ruin mine.
👍 26👎 0

busy_mom_123
Thanks for the tip about removing the case. Didn’t think to check the corners until now.
👍 27👎 0

clean_tech_fan
Honestly surprised how well the dry cloth step worked. Found so much grit before even touching water!
👍 2👎 0