Step-by-Step Guide to Install a New Light Fixture
Brighten Up Your Space with Confidence
### Step-by-Step Guide to Install a New Light Fixture
1. Introduction to Installing a New Light Fixture
Overview of the Importance of Proper Lighting Installation: Properly installed lighting not only enhances the aesthetics of your space but also ensures safety and energy efficiency. Incorrect installation can lead to malfunctions, hazards, and even fire risks.
Safety Precautions and Tools Required for the Task: Before beginning any electrical work, it's crucial to prioritize safety. Always wear rubber-soled shoes and avoid working in wet conditions. Gather necessary tools such as a screwdriver, wire stripper, voltage tester, and a sturdy ladder if needed.
2. Preparation: Gathering Necessary Tools and Materials
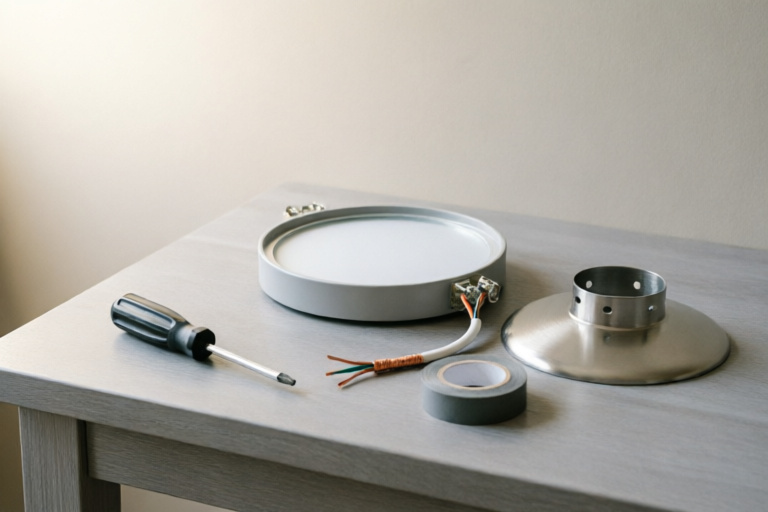
List of Essential Tools: Ensure you have the following tools on hand: a Phillips head screwdriver, a flathead screwdriver, wire strippers, a voltage tester, pliers, and a drill (if necessary).
Types of Light Fixtures Available in the Market: There are various types of light fixtures including recessed lights, pendant lights, chandeliers, track lights, and wall sconces. Choose one that fits your room's design and lighting needs.
Checking Local Electrical Codes and Permits: Before starting the installation, check with your local building department to see if a permit is required. Familiarize yourself with the relevant electrical codes to ensure compliance.
3. Turning Off the Power Supply
How to Locate the Main Circuit Breaker: Find your home’s main electrical panel and identify the circuit breaker controlling the area where the light fixture is located. Turn off this breaker to ensure there is no power flowing to the fixture.
Proper Procedure to Ensure No Power is Flowing to the Fixture: Use a voltage tester to double-check that the power is off. Touch both ends of the tester to the wires inside the junction box to confirm there is no electricity.
4. Removing the Old Light Fixture
Identifying Wires and Connections: Carefully remove the screws holding the old fixture in place and detach it from the ceiling or wall. Identify the black (hot), white (neutral), and green or bare copper (ground) wires.
Safely Disconnecting the Old Fixture from the Wiring: Disconnect the wires by loosening the wire nuts or terminal screws. Make sure all connections are loose before removing the fixture completely.
5. Installing the New Light Fixture
Connecting the New Fixture to the Existing Wiring: Attach the new fixture to the wires by matching the colors. Connect the black wire from the fixture to the black wire in the junction box, the white wire to the white wire, and the green or bare copper wire to the ground wire.
Ensuring Correct Polarity and Grounding: Verify that the hot and neutral wires are correctly connected. Check the ground wire to ensure it is securely attached to the metal box or mounting bracket.
Securing the Fixture to the Ceiling or Wall: Once all wires are properly connected, secure the fixture to the ceiling or wall using the appropriate screws. Tighten them firmly to prevent the fixture from wobbling.
6. Final Checks and Testing
Inspecting All Connections for Tightness and Safety: Double-check all connections to ensure they are tight and secure. Look for any frayed wires or damaged insulation.
Reconnecting Power Supply and Testing the New Fixture: Turn the circuit breaker back on and test the new light fixture. If the light does not turn on, check all connections again.
Tips for Ongoing Maintenance and Troubleshooting: Regularly inspect your light fixtures for any signs of damage or wear. If the fixture stops working, first check the bulb and then the wiring connections.
7. Conclusion: Enjoy Your New Lighting!
Summary of Key Steps Taken: You've successfully turned off the power, removed the old fixture, installed the new one, and tested it. Congratulations on completing your project!
Additional Resources for Further Learning and Assistance: For more detailed information, consult an electrician or refer to manufacturer instructions. Online tutorials and forums can also provide valuable insights and support.
Comments

Just finished the installation. Great job explaining how to check the polarity. Made sure everything was wired correctly before flipping the switch.

This tutorial really helped cut down on costs by doing it myself. Thanks!
Super helpful! I learned a lot about electrical safety I didn't know before. Is there a similar guide for installing recessed lighting?

I followed these steps exactly and everything went smoothly. The only thing missing is a bit more detail on how to properly secure the mounting bracket to the ceiling. Any tips?

Great step-by-step guide! Quick question though - what do I do if my voltage tester doesn't detect any power but I'm still getting a shock when touching the wires?
Worked for me! The part about checking local electrical codes saved me a lot of trouble. I didn't know I needed a permit for this.

This guide was super helpful! I finally installed that new ceiling light I've been putting off. Just make sure you double-check the wiring before turning the power back on.