# How to Fix a Leaky Faucet in Under 30 Minutes Fast
A persistent dripping sound from your kitchen or bathroom sink can be incredibly annoying, especially during the quiet hours of the night. Beyond the noise pollution, a leaking faucet represents wasted water and higher utility bills. Many homeowners hesitate to tackle plumbing issues themselves, fearing they might cause more damage or require expensive professional help. However, most faucet leaks are caused by simple wear and tear on internal components that can be easily replaced. With the right preparation and tools, you can fix a leaky faucet in under 30 minutes fast.
This guide is designed to empower you with the knowledge to diagnose the problem, gather the correct parts, and execute the repair efficiently. We will walk through every stage of the process, from safety checks to final testing, ensuring your faucet runs smoothly for years to come. By following these steps, you not only solve the immediate nuisance but also adopt better water conservation habits in your home.
## 1. Quick Preparation and Safety Checks
Before you begin the physical work of dismantling your faucet, proper preparation is crucial. Rushing into the job without a plan often leads to stripped screws, lost small parts, or accidental water damage. The first rule of any plumbing repair is safety and organization.
### Clearing the Workspace
The area under your sink is often cluttered with cleaning supplies, trash cans, and extra storage boxes. You need clear access to the plumbing connections. Remove everything from the cabinet space beneath the faucet. Place a large towel or several rags on the bottom of the sink basin to catch any falling debris. Do not rely solely on the floor mat; you want to avoid scratching the finish of the sink. A bucket should be positioned directly under the U-shaped trap (the p-trap) to catch residual water when you disconnect pipes later.
### Turning Off the Water Supply
One of the most critical safety checks is ensuring the water supply is completely shut off before loosening any fittings. Most faucets have two shut-off valves located on the wall or floor behind the toilet or near the base of the sink cabinet. Locate the hot and cold handles and turn them clockwise until they stop. They are typically brass or plastic and may be stiff due to age. If you do not find individual valves, or if they appear corroded and seized, you will need to shut off the main water valve to the house to prevent flooding.
Once the water is off, test the faucet by turning the handle to the "on" position. If a little trickles out and then stops, you know the line pressure has been successfully isolated. However, always keep the bucket and towels ready even after turning off the valves, as pressure can remain in the lines.
### Protecting Your Hands and Eyes
Even though this is a minor repair, wearing safety glasses is recommended because rust particles or old caulk can fall into your eyes. Additionally, plumbing nuts can sometimes be sharp when removed. Consider using latex gloves to protect your hands from bacteria found in old drain water and to give you a better grip on greasy or slimy parts.
## 2. Diagnosing the Leak Source Quickly
Identifying the exact source of the leak is vital because different types of faucets require different repair techniques. A dripping spout is treated differently than a leak originating from the base of the handle. Misdiagnosing the issue can lead to buying the wrong replacement parts and having to restart the process.
### Identifying the Type of Faucet
There are four main types of residential faucets, each utilizing a different mechanism to control water flow:
1. **Compression Faucets:** These are traditional styles with separate hot and cold handles. You tighten a washer against a seat to stop the flow. They are common in older homes and often leak at the handle.
2. **Cartridge Faucets:** These use a removable cartridge that moves up and down or rotates. They can have one or two handles. Leaks usually occur around the handle base or the spout.
3. **Ball Faucets:** Often found in kitchens, these have a single handle that rides over a curved cap. Inside is a rotating ball that mixes hot and cold water. O-rings and cam washers often wear out.
4. **Ceramic Disc Faucets:** Modern style with a smooth feel. There are no rubber washers. Seals or gaskets usually fail here rather than internal discs, unless the disc cracks.
Look at your faucet handles and the body to determine which category it falls into. Taking photos of the assembly with your phone can be helpful later if you forget how the pieces fit together.
### Locating the Drip Point
Wipe the faucet dry with a clean cloth. Then, turn the water supply back on momentarily and observe exactly where the water comes from.
* **Leaking from the Spout:** This indicates the internal seal isn't closing properly. For compression faucets, the washer is worn. For cartridge models, the seals inside the cartridge are damaged.
* **Leaking from the Handles:** This usually points to worn-out O-rings or packing nuts. The water is bypassing the seals around the stem.
* **Leaking from the Base:** If water pools at the bottom of the faucet where it meets the counter, the connection between the faucet and the sink deck may have a failed gasket, or the mounting nut is loose.
Knowing the source allows you to purchase a targeted repair kit instead of guessing. Most hardware stores sell universal kits, but knowing your type ensures compatibility.
## 3. Essential Tools and Parts Checklist
To meet the goal of finishing the repair in under 30 minutes, you must have everything gathered before you take the first screw out. Missing a single component midway through disassembly forces you to leave the project half-done, which increases the chance of corrosion setting in or losing parts down the drain.
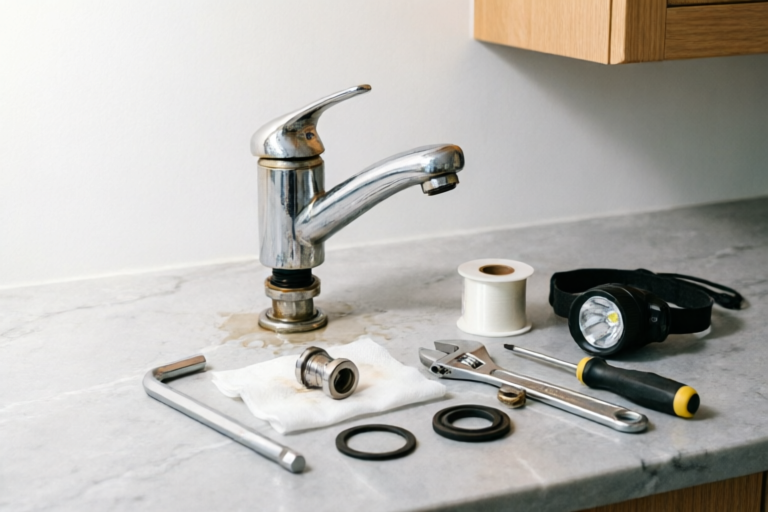
### Basic Tool Kit Required
* **Adjustable Wrench:** A pair is ideal. One to hold the fitting and one to turn the nut. Having a second adjustable wrench prevents twisting the water supply lines accidentally.
* **Screwdrivers:** Both flathead and Phillips head screwdrivers are necessary. Some fixtures use hidden screws covered by decorative caps.
* **Allen Wrench Set:** Many modern cartridge faucets use hex bolts to secure handles. A small set of metric or standard Allen keys is often needed.
* **Pliers:** Needle-nose pliers help retrieve small parts stuck in crevices or pull out old O-rings. Channel locks are great for larger nuts.
* **Basin Wrench:** This specialized tool reaches tight spaces under the sink to loosen or tighten nuts that hold the faucet in place. It is indispensable if you need to remove the entire fixture.
* **Flashlight or Headlamp:** The area under the sink is dark. Good visibility prevents mistakes and helps you see small O-rings.
* **Penetrating Oil:** If parts are corroded, spray some WD-40 or similar oil before attempting to unscrew them.
### Specific Repair Parts
While waiting to identify the part number, you can purchase a "Faucet Repair Kit." These often contain multiple sizes of washers and O-rings. Ensure you bring the old part to the store to match it exactly. Common replacements include:
* **Rubber Washers:** Specifically for compression faucets. Bring the old one to check the diameter and thickness.
* **O-Rings:** Small rubber rings that create a watertight seal around moving parts. Get a variety pack.
* **Seat Dresser Tool:** If the brass seat the washer rests on is pitted or scored, a new washer won't seal. A seat dresser resurfaces it, saving you from replacing the whole faucet.
* **Faucet Cartridges:** For cartridge models, buying the specific model number printed on the old unit is non-negotiable. Plastic cartridges crack easier than brass ones, so consider upgrading to ceramic for longevity.
Having these tools organized on your workspace bench minimizes downtime during the repair process.
## 4. Step-by-Step Repair Procedure
With the water off, the workspace cleared, and tools in hand, you are ready to begin the actual repair. This procedure assumes a standard scenario but highlights key variations for different faucet types to ensure success.
### Removing the Handle
Start by removing the faucet handle. Look for a small set screw located on the side or underneath a decorative cap. Pop off the cap (often prying gently with a flathead screwdriver) to reveal the screw. Loosen the screw and lift the handle off. If the handle is stuck due to mineral buildup, wiggle it gently or apply penetrating oil and wait a few minutes. Do not use excessive force, or you might snap the plastic cover or strip the screw.
### Accessing the Stem and Internal Components
Once the handle is off, you will expose the internal mechanism. For a compression faucet, there will be a retaining nut securing the stem. Use your adjustable wrench to hold the stem steady and unscrew the nut. Lift the stem out carefully.
For cartridge faucets, you may need to unscrew a retaining clip or a threaded ring holding the cartridge housing. Slide the cartridge out. For ball faucets, remove the spring and the plastic cam assembly above the ball. Inspect the ball mechanism for grooves. If they are deep, the ball needs replacing; otherwise, simply replace the rubber seals.
### Replacing the Worn-Out Parts
Examine the parts you have removed. Rubber washers lose their elasticity over time and become hard or cracked. If it is hard, brittle, or misshapen, replace it immediately. Install the new washer onto the stem, ensuring it sits flush against the bottom groove.
If you are replacing O-rings, apply a thin layer of plumber's grease to the new rings. This makes future removal easier and ensures a tighter seal against friction. Pull the old O-ring out of its groove, slide the new one on in the same position, and push it firmly into place. Avoid twisting the O-ring too much, as this causes premature failure.
In the case of cartridge faucets, insert the new cartridge with the correct alignment (usually indicated by tabs or arrows). Push it firmly until it clicks or seats fully. Never force it; if it doesn't fit, double-check the orientation.
### Reassembling the Fixture
Reverse the disassembly process to put everything back together. Tighten the retaining nut, but be careful not to over-tighten. Over-tightening compresses the rubber internally or strips the metal threads, leading to new leaks. Snug is sufficient.
Reattach the handle, aligning the splines (the ridges that lock the handle to the stem) correctly. Screw the set screw back in and replace the decorative cap. Ensure the handle turns smoothly. If it feels gritty, you may need to adjust the depth of the cartridge or add more lubrication. Clean the exterior of the faucet with a soft cloth and mild soap to remove grime from your working hours.
## 5. Final Testing and Prevention Advice
The repair is not complete until you verify the system is watertight. Take a moment to review the work one last time to ensure nothing was left loose or forgotten.
### Turning the Water Back On
Slowly open the shut-off valves under the sink. Turn them counter-clockwise gradually. Listen for any hissing sounds that might indicate air in the pipes or a rush of pressure. Once fully open, turn the faucet handle to "on" and let the water run for about a minute. This flushes out any debris that fell into the pipes during the repair. Close the water and check for drips.
Watch closely under the sink first. Check the base of the faucet for pooling water. If water drips from the base, the mounting nut may not be tight against the sink surface. Tighten it carefully from below. Next, check the handle area and the spout tip. A slow drip after tightening indicates you may need to check the washer seating again. If it still leaks, you may have missed a hairline fracture in the brass seat or another component.
### Tips for Proper Tightening
A common mistake is overtightening the handle stems. When installing a new washer, do not crank the handle down as hard as possible. The washer is designed to seal at a specific pressure. Overtightening crushes the washer unevenly, causing it to deform and eventually fail faster. Follow the manufacturer's torque guidelines if available. Generally, finger-tight plus a quarter turn with a wrench is adequate for most connections.
### Routine Maintenance for Longevity
To keep your faucet running smoothly long-term, adopt these preventive measures:
* **Monthly Inspection:** Give the handles and base a quick visual check once a month. Catching a seepage early saves a major leak later.
* **Avoid Abrasive Cleaners:** Steel wool or harsh scrubbing powders can scratch the protective finish of the faucet, making it harder to clean and prone to corrosion. Use mild dish soap and warm water.
* **Lubricate Moving Parts:** Once a year, apply a small amount of silicone-based plumber's grease to O-rings and stems. This keeps the plastic and rubber flexible.
* **Address Hard Water:** If you live in an area with hard water, calcium buildup can interfere with sealing mechanisms. Cleaning aerators regularly with vinegar helps maintain pressure and flow.
By following these steps and maintaining a proactive attitude toward your home's plumbing, you extend the life of your fixtures. Saving water starts with fixing what we have. Fixing a leaky faucet in under 30 minutes fast is not just about convenience; it is an act of responsible stewardship of your household resources.
## Conclusion
Fixing a leaky faucet is a manageable task for any homeowner willing to invest a short afternoon into the project. By preparing safely, diagnosing accurately, using the right tools, and following a methodical repair procedure, you can restore your sink to perfect condition without calling a plumber. Remember, the goal is efficiency—gathering everything beforehand and taking the time to work carefully ensures you won't have to dismantle the faucet again next week. Enjoy your quiet kitchen and savings on your water bill. Start your toolkit, grab the replacement parts, and get that drip stopped today.