Step-by-Step Guide to Replace a Broken Light Switch
DIY Electrical Repairs Made Easy
Step-by-Step Guide to Replace a Broken Light Switch
1. Introduction to Replacing a Light Switch
Importance of replacing a broken light switch: A faulty light switch can be inconvenient and potentially dangerous. It may cause flickering lights, buzzing sounds, or even short circuits. Replacing it promptly ensures safe and reliable operation.
Safety precautions before starting the replacement process: Always turn off the power supply at the circuit breaker to avoid electric shocks. Use a voltage tester to verify that there is no current flowing through the wires.
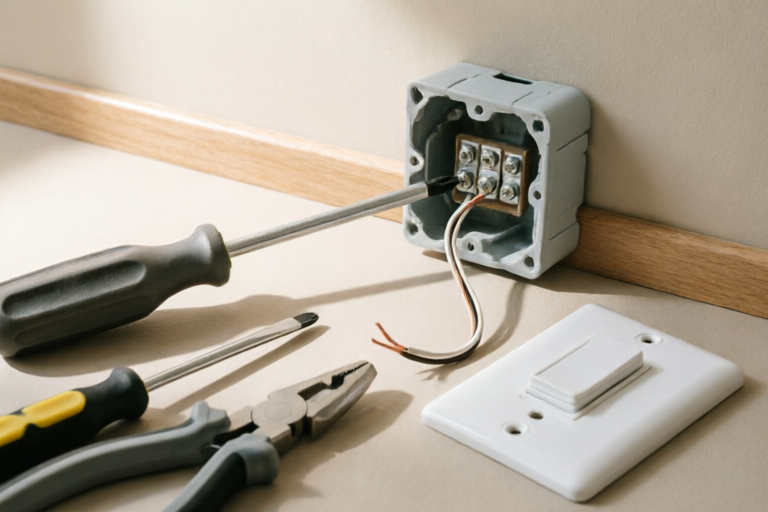
Tools and materials needed for the job: You will need a screwdriver, wire strippers, electrical tape, a voltage tester, and the new light switch. Ensure all tools are in good condition and appropriate for the task.
2. Preparing for the Replacement
Turning off the power supply at the circuit breaker: Locate the correct circuit breaker and flip it to the 'off' position. Double-check by using a voltage tester on the wires.
Removing the old light switch cover plate: Unscrew the screws holding the cover plate in place and carefully remove it. This exposes the screws securing the switch itself.
Identifying wires and their connections: Note the color of the wires connected to the old switch—typically black (hot), white (neutral), and green or bare copper (ground). These colors help you correctly reconnect the wires later.
3. Disconnecting the Old Light Switch
Detaching the wires from the old switch: Loosen the terminal screws on the switch and gently pull the wires away. Be cautious not to damage the insulation.
Safely removing the old switch from the electrical box: Unscrew the mounting screws on the sides of the switch and carefully pull it out of the electrical box. Keep the wires organized as you remove them.
Inspecting the electrical box for any issues: Check inside the box for signs of corrosion, loose wiring, or other potential problems. If anything looks amiss, consult an electrician before proceeding.
4. Installing the New Light Switch
Connecting the wires to the new switch: Align the wires with the corresponding terminals on the new switch. Tighten the screws securely but avoid overtightening, which could strip the threads.
Securing the new switch in the electrical box: Insert the switch back into the electrical box and attach it using the mounting screws. Ensure the switch is firmly in place and level.
Ensuring proper alignment and stability: Gently press the switch against the wall and check for any wobbling. If necessary, adjust the screws slightly until the switch feels stable.
5. Testing the New Light Switch
Restoring power to the circuit: Turn the circuit breaker back to the 'on' position. Wait a moment to allow the system to stabilize.
Testing the functionality of the new switch: Flip the switch on and off several times to ensure it operates smoothly. The light should turn on and off as expected.
Troubleshooting common issues if the switch does not work: If the switch doesn't function properly, first check the connections and tighten any loose screws. Verify that the circuit breaker is turned on and that there are no tripped breakers. If the problem persists, consider consulting a professional electrician.
6. Finalizing the Installation
Reattaching the cover plate to the wall: Once you're satisfied with the installation, screw the cover plate back onto the wall. Make sure it's flush with the surface for a clean finish.
Cleaning up tools and disposing of waste materials: Gather all your tools and any debris from the work area. Dispose of any old parts responsibly, and store your tools properly for future use.
Tips for maintaining the new light switch: Regularly check the switch for any signs of wear or malfunction. Keep the area around the switch clean to prevent dust buildup, which can affect performance over time.
Conclusion
Recap of key steps for successful light switch replacement: Turn off the power, remove the old switch, connect the new one, test it, and secure everything. By following these steps carefully, you can ensure a smooth and safe installation.
Encouragement for DIY enthusiasts to tackle similar home improvement projects: With the right tools and knowledge, many home repairs can be accomplished without hiring professionals. This experience can boost your confidence and save money.
Resources for further learning and troubleshooting: For more information on electrical work or troubleshooting tips, consult reputable sources such as online forums, instructional videos, or local hardware stores. Stay informed and stay safe!
Comments

Worked for me. Just took longer than expected because I'm not used to working with electrical stuff.

Quick question: do you recommend any particular brand of light switches?

I followed every step, but the new switch doesn't seem to work. Did I miss something obvious?

This is my first time doing something like this. The step-by-step really helped. Now I'm ready for bigger projects!

Super helpful! I didn't have all the tools, so I had to improvise with some household items. Still got it done!

Great guide! Just wanted to add that I used wire nuts instead of the screw terminals. It felt more secure.

I had trouble with step 4, connecting the wires. Can someone explain how to match the colors again?

Worked like a charm! I was nervous about turning off the power, but the tutorial made it clear and safe. Thanks!